Lets Finish the Inventory System
Now if we look at the hierarchy of the character, we will see that under the modular character section we have a breakdown of the different parts of the body. A you can see in the picture we need to add the name of the item on the modular character that we want to turn on with this equipment.
2.
The thing that bothers me about many inventory system tutorials is the fact you have to imagine your character has added a hat or boots. The artists produce simple characters that can’t interchange items. But now, with the help of modular characters, we can.
For those that need an intro to modular characters, they are characters that have items stacked on them which can be turned on and off. As we go along in this tutorial hopefully it'll become clearer.
Now before we get too deep into this tutorial there are a few requirements to completing this tutorial.
- You will need to have a modular character. Synty has produced a great asset pack, which is the one I will show you in this tutorial, but I don’t have the ability to give you the asset for free. There are plenty of other modular characters if you search in the Unity Store and I will include enough pictures of what I am doing to allow you to recreate this with something else. I am choosing Synty simply because this series was based pretty heavily on the Synty assets, and I wanted to keep to that theme.
- The second requirement is that must have gone through the GameDev.tv Inventory course. We won’t be using anything from the shops course and if you do go through that, this code shouldn’t get in the way of it as most of it is completely separate.
Now onward and upwards…
Adding The Character
The first thing we need to do is replace our player character with the new character that we will use. This is a simple drag and drop the new character under the player prefab and then you can either delete the old character or disable him until you are done.
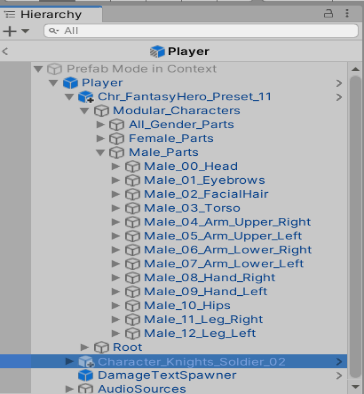
Now if we look at the hierarchy of the character, we will see that under the modular character section we have a breakdown of the different parts of the body. If we expand the head tab, we have 2 sections. They are named weirdly but the one labeled Male_Head_No_Elements are the different knights’ helmets. I am going to rename this to Male_Helmets to make it clearer what it is.
Setting Up Our Scripts
We will get back to the player in a bit. For now, I want to go into the inventory folder under the scripts folder and create a script called ModelChanger. This script will be a Monobehaviour and we will put it in the RPG.Inventories namespace. The first thing we need to add is a List of Gameobjects and populate it in Awake().
public class ModelChanger: MonoBehaviour
{
public List<GameObject> models = new List<GameObject>();
private void GetAllChildren()
{
int childrenGameObjects = transform.childCount;
for (int i = 0; i < childrenGameObjects; i++)
{
models.Add(transform.GetChild(i).gameObject);
}
}
private void Awake()
{
GetAllChildren();
}</div></code><button aria-label="Copy code" aria-pressed="false" class="flex justify-center group items-center outline-hidden bg-turquoise shadow-button-secondary fill-shadow-grey hover:bg-fresh-green hover:shadow-button-secondary-hover active:bg-dark-teal active:shadow-button-secondary-active active:fill-ivory transition-all cursor-pointer disabled:cursor-auto select-none absolute right-4 top-4 h-10 w-10"><svg xmlns="http://www.w3.org/2000/svg" height="20px" width="20px" viewBox="0 -960 960 960" fill="inherit" class="group-aria-pressed:hidden"><path d="M360-240q-33 0-56.5-23.5T280-320v-480q0-33 23.5-56.5T360-880h360q33 0 56.5 23.5T800-800v480q0 33-23.5 56.5T720-240H360Zm0-80h360v-480H360v480ZM200-80q-33 0-56.5-23.5T120-160v-520q0-17 11.5-28.5T160-720q17 0 28.5 11.5T200-680v520h400q17 0 28.5 11.5T640-120q0 17-11.5 28.5T600-80H200Zm160-240v-480 480Z"></path></svg><svg xmlns="http://www.w3.org/2000/svg" height="20px" width="20px" viewBox="0 -960 960 960" fill="inherit" class="hidden group-aria-pressed:block"><path d="m382-354 339-339q12-12 28-12t28 12q12 12 12 28.5T777-636L410-268q-12 12-28 12t-28-12L182-440q-12-12-11.5-28.5T183-497q12-12 28.5-12t28.5 12l142 143Z"></path></svg></button></pre><p>The next functions are for unequipping and equipping the different models:</p><pre class="flex flex-row w-full items-start justify-between !p-5 relative break-words whitespace-break-spaces"><code class="flex flex-col w-full !pr-11 break-word"><div style="white-space: inherit;">public void UnequipAllModels()
{
foreach (var model in models)
{
model.SetActive(false);
}
}
public void EquipModelByName(string modelName)
{
for (int i = 0; i < models.Count; i++)
{
if (models[i].name == modelName)
{
models[i].SetActive(true);
}
}
}</div></code><button aria-label="Copy code" aria-pressed="false" class="flex justify-center group items-center outline-hidden bg-turquoise shadow-button-secondary fill-shadow-grey hover:bg-fresh-green hover:shadow-button-secondary-hover active:bg-dark-teal active:shadow-button-secondary-active active:fill-ivory transition-all cursor-pointer disabled:cursor-auto select-none absolute right-4 top-4 h-10 w-10"><svg xmlns="http://www.w3.org/2000/svg" height="20px" width="20px" viewBox="0 -960 960 960" fill="inherit" class="group-aria-pressed:hidden"><path d="M360-240q-33 0-56.5-23.5T280-320v-480q0-33 23.5-56.5T360-880h360q33 0 56.5 23.5T800-800v480q0 33-23.5 56.5T720-240H360Zm0-80h360v-480H360v480ZM200-80q-33 0-56.5-23.5T120-160v-520q0-17 11.5-28.5T160-720q17 0 28.5 11.5T200-680v520h400q17 0 28.5 11.5T640-120q0 17-11.5 28.5T600-80H200Zm160-240v-480 480Z"></path></svg><svg xmlns="http://www.w3.org/2000/svg" height="20px" width="20px" viewBox="0 -960 960 960" fill="inherit" class="hidden group-aria-pressed:block"><path d="m382-354 339-339q12-12 28-12t28 12q12 12 12 28.5T777-636L410-268q-12 12-28 12t-28-12L182-440q-12-12-11.5-28.5T183-497q12-12 28.5-12t28.5 12l142 143Z"></path></svg></button></pre><p>So now the next class we will add is HelmetModelChanger. This class will be inherited from Model changer.</p><pre class="flex flex-row w-full items-start justify-between !p-5 relative break-words whitespace-break-spaces"><code class="flex flex-col w-full !pr-11 break-word"><div style="white-space: inherit;">public class HelmetModelChanger : ModelChanger
{
}</div></code><button aria-label="Copy code" aria-pressed="false" class="flex justify-center group items-center outline-hidden bg-turquoise shadow-button-secondary fill-shadow-grey hover:bg-fresh-green hover:shadow-button-secondary-hover active:bg-dark-teal active:shadow-button-secondary-active active:fill-ivory transition-all cursor-pointer disabled:cursor-auto select-none absolute right-4 top-4 h-10 w-10"><svg xmlns="http://www.w3.org/2000/svg" height="20px" width="20px" viewBox="0 -960 960 960" fill="inherit" class="group-aria-pressed:hidden"><path d="M360-240q-33 0-56.5-23.5T280-320v-480q0-33 23.5-56.5T360-880h360q33 0 56.5 23.5T800-800v480q0 33-23.5 56.5T720-240H360Zm0-80h360v-480H360v480ZM200-80q-33 0-56.5-23.5T120-160v-520q0-17 11.5-28.5T160-720q17 0 28.5 11.5T200-680v520h400q17 0 28.5 11.5T640-120q0 17-11.5 28.5T600-80H200Zm160-240v-480 480Z"></path></svg><svg xmlns="http://www.w3.org/2000/svg" height="20px" width="20px" viewBox="0 -960 960 960" fill="inherit" class="hidden group-aria-pressed:block"><path d="m382-354 339-339q12-12 28-12t28 12q12 12 12 28.5T777-636L410-268q-12 12-28 12t-28-12L182-440q-12-12-11.5-28.5T183-497q12-12 28.5-12t28.5 12l142 143Z"></path></svg></button></pre><p>This class will stay empty because we will get all the functions from model changer and that’s what we want. We just want to use the other class name to keep them differentiated. This class we will add to our Male_Helmets portion of our character.</p><img src="https://lh3.googleusercontent.com/M7llWVgj_tpSkQ9R-pZI2vGFykmTzaHZP9hjffAguB9Xx2ns-t3iYMMphaN4gDLsHA2GiFqnv0GwaoXt0chusUAuWoYfu_NubyuOW5RLrspAhU2gL7kilIWW0atY3jY5UqjWkio" alt="Graphical user interface
Description automatically generated with medium confidence" onload="(()=>{if(this.attributes.height!==null&&this.attributes.height>0){return}window.dispatchEvent(new Event('resize'))})();">
If we play the game now, we will see that all the models have been populated into the models list.
<img src="https://lh4.googleusercontent.com/q0EL7NnD4KEuVS64CtMJ_QZxENLptJo2jHlzq90Lkbnv-ZXBvfQiF4NniJkRn52h6cV48kIQcJmeN7RQf07Su-IFYnbF9hBFthuX7fvHTO4uMqP_JclT1YF-qAfFGuypBJmdVQ0" alt="A picture containing text, screenshot, electronics, computer
Description automatically generated" onload="(()=>{if(this.attributes.height!==null&&this.attributes.height>0){return}window.dispatchEvent(new Event('resize'))})();">
The StatEquipment Script
This is great, now that we can populate the list, we will be able to manipulate it. So now we head over the StatEquipment script that is on the player prefab. This is the script that was added at the end of the Inventory course. The first thing we want to add is a serialized field for a gameobject named headModel. Then we want a reference to HelmetModel Changer and set it on Awake().
[SerializeField] GameObject headModel;
private void Awake()
{
helmetModelChanger = GetComponentInChildren<HelmetModelChanger>();
}
After we have done this, we need to create a function called EquipOnStart and we will call this method from our start function. The method is below. For right now all this method will do is unequip the models and set our headmodel to active.
private void Start()
{
EquipOnStart();
}
private void EquipOnStart()
{
helmetModelChanger.UnequipAllModels();
headModel.SetActive(true);
}</div></code><button aria-label="Copy code" aria-pressed="false" class="flex justify-center group items-center outline-hidden bg-turquoise shadow-button-secondary fill-shadow-grey hover:bg-fresh-green hover:shadow-button-secondary-hover active:bg-dark-teal active:shadow-button-secondary-active active:fill-ivory transition-all cursor-pointer disabled:cursor-auto select-none absolute right-4 top-4 h-10 w-10"><svg xmlns="http://www.w3.org/2000/svg" height="20px" width="20px" viewBox="0 -960 960 960" fill="inherit" class="group-aria-pressed:hidden"><path d="M360-240q-33 0-56.5-23.5T280-320v-480q0-33 23.5-56.5T360-880h360q33 0 56.5 23.5T800-800v480q0 33-23.5 56.5T720-240H360Zm0-80h360v-480H360v480ZM200-80q-33 0-56.5-23.5T120-160v-520q0-17 11.5-28.5T160-720q17 0 28.5 11.5T200-680v520h400q17 0 28.5 11.5T640-120q0 17-11.5 28.5T600-80H200Zm160-240v-480 480Z"></path></svg><svg xmlns="http://www.w3.org/2000/svg" height="20px" width="20px" viewBox="0 -960 960 960" fill="inherit" class="hidden group-aria-pressed:block"><path d="m382-354 339-339q12-12 28-12t28 12q12 12 12 28.5T777-636L410-268q-12 12-28 12t-28-12L182-440q-12-12-11.5-28.5T183-497q12-12 28.5-12t28.5 12l142 143Z"></path></svg></button></pre><p>Now if we go back into the game, we will have to go to the script on the player prefab and set our head model. The head model is what we want our player to start out with when we first start the game. I have chosen to have a head that doesn’t have a helmet. This is located under the Male_Head_All_Elements and it is Chr_Head_Male_00.</p><img src="https://lh3.googleusercontent.com/NDBseoUBfm8MlAfbPPTQvAbgo4tmojTzWkSaTxVvt0AGYEp-OlE0dsmeLTfqnokVPPb1ZLOTTNfjqt48TgOrXDqU5DVSTAfxI-2jVVuIQCrstSpj1flWNKWROoCA258dQ69uSJo" alt="Graphical user interface, application
Description automatically generated" onload="(()=>{if(this.attributes.height!==null&&this.attributes.height>0){return}window.dispatchEvent(new Event('resize'))})();">
Please Note: Don’t worry about the Current Equipment section you won’t have that. My prototype is a little further ahead.
So now if we hit play our character should of went from the helmet he is wearing in the model to the bald head man with no helmet.
Setting Up The Item
The next item on our agenda is we need to go into the statEquippableItem script and add a public string itemName. Now let me preface this by saying I hate string references. They are to easy to mess up and end up with it not working. I think at the end of this I will change this to an enum system that will be a lot easier for a designer to work with but why we are setting up and testing we will go with the string reference. So anyways now that that is added we need to go into our items and add the string reference. This string is pointing to the actual name of the item on the character. I am showing an example of the healthy hat. A you can see in the picture we need to add the name of the item on the modular character that we want to turn on with this equipment.

The last thing we need to do is create an UpdateEquipment function in our stat equipment.
private void UpdateEquipment()
{
// Debug.Log("Update Equipment Called");
var helmet = GetItemInSlot(EquipLocation.Helmet) as StatEquipableItem;
if(helmet != null)
{
helmetModelChanger.UnequipAllModels();
headModel.SetActive(false);
helmetModelChanger.EquipModelByName(helmet.itemName);
}
}
As you can see this will tie everything together and allow the item to be set. Now the question is where do we call this function. If you remember from the inventory course we used an Action called equipment updated to call update weapon and set it. This will work nicely for us as well so in the Awake of the statequipment script add:
private void Awake()
{
helmetModelChanger = GetComponentInChildren<HelmetModelChanger>();
equipmentUpdated += UpdateEquipment;
}
Before we press play, I almost forgot we need to make a pickup for this the item we created. I chose to modify my healthy hat and make that my item. Once we do that if we press play and pickup the hat, we will see it on our inventory like expected. If we then equip the hat into the head slot we can see our player went from a bald head to wearing a helmet.
There we go, we now have a working wearable inventory. I will leave doing the chest and pants as an exercise to you because they are basically the same steps. The gloves and boots are a little different, at least with the Synty pack. For some reason they separated out the left and right side. In Part 2 I will go over a fix I came up to rectify that. As well as how we can save these items like our weapon so they will equip on startup.


