
Make a fully functional calculator in Unity not only for VR, Part III
Similarly, we can assign the BoxCollider of the CalcButton to the Poke Collider property of the XR Poke Filter component and for each XR Poke Follow Affordance component, we can assign the transform component of the corresponding CalcButton to the Poke Follow Transform property. xr. xr. xr. hands": "1. 3. 3. 3. 3.
In the previous part, we finished our calculator and gained knowledge about tokenization, a recursive descent parser, and the Abstract Syntax Tree (AST). Today, our focus will be on adapting this project to a virtual reality VR environment, using the OpenXR, XR Interaction Toolkit, and XR Hands packages.
These packages are provided by Unity Technologies. They provide a level of abstraction that allows us to worry less about the differences between VR devices.
However, note that I have tested all of this only on Valve Index. While the steps should theoretically be independent of the device, there may be minor differences that could arise in practice.
In the event of any troubles, I recommend referring to the documentation of the abovementioned packages. You can find the respective links provided in the first paragraph.
Exporting Calc Prefab
If you have been following along with the previous parts and would like to continue doing so in this section, export the Calc.prefab we've created. Right-click on the Project content tab and from the context menu that appears, select Export Package... .
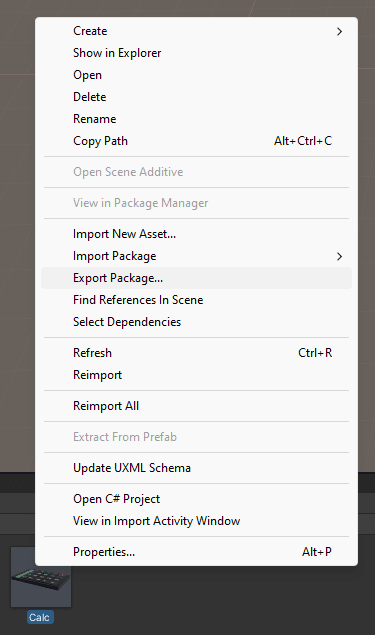 "
"Before you click on Export..., make sure to deselect everything that is not part of the prefab.
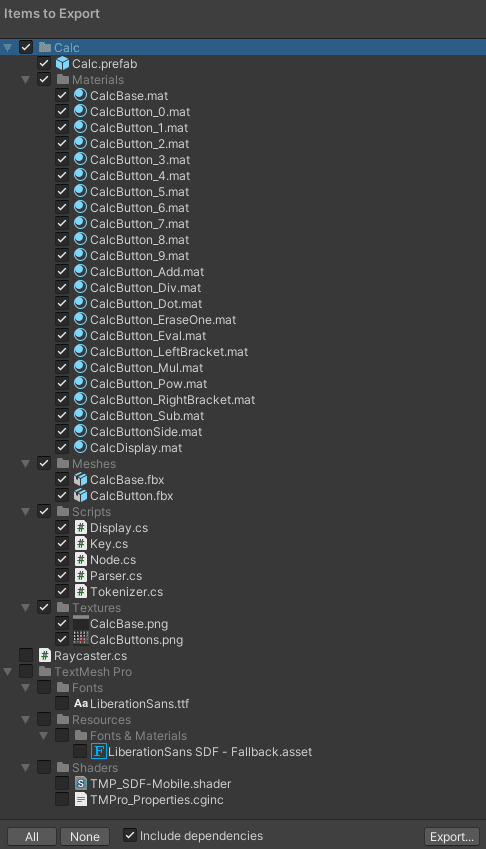 It is not necessary to export TextMesh Pro. We will import it into the new project directly from the Unity Package Registry.
To begin, create a new Unity project using the core 3D template. I recommend using Unity 2021.3.24f1, as this is the version I created the example project for this tutorial.
Next, drag and drop the previously exported .unitypackage file into the Project content tab. Confirm the import dialog that appears. You should also be prompted by the TMP Importer.
 This is our starting point in a new Unity project.
Plugin Installation
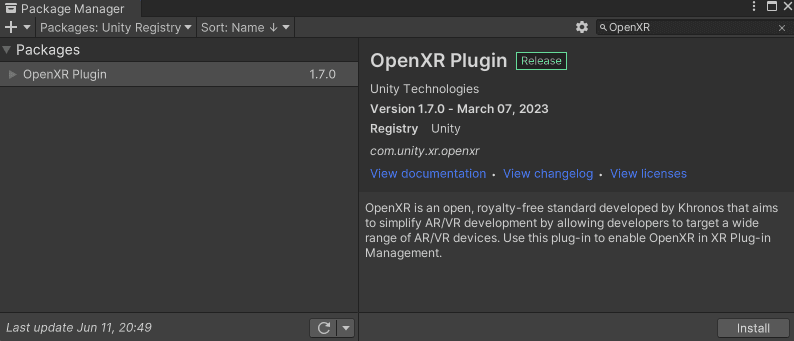
Time to install packages. Go to the Unity Editor menu and select Window → Package Manager. In the top-left corner of the Package Manager window, switch from Packages: In Project to Packages: Unity Registry. Search for the OpenXR Plugin, the search bar is located in top right corner. Once you find it, select the package and hit Install.
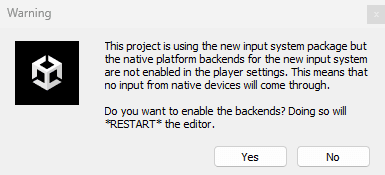
During the installation, you should get a warning window. Click Yes to proceed and let the editor restarts itself.
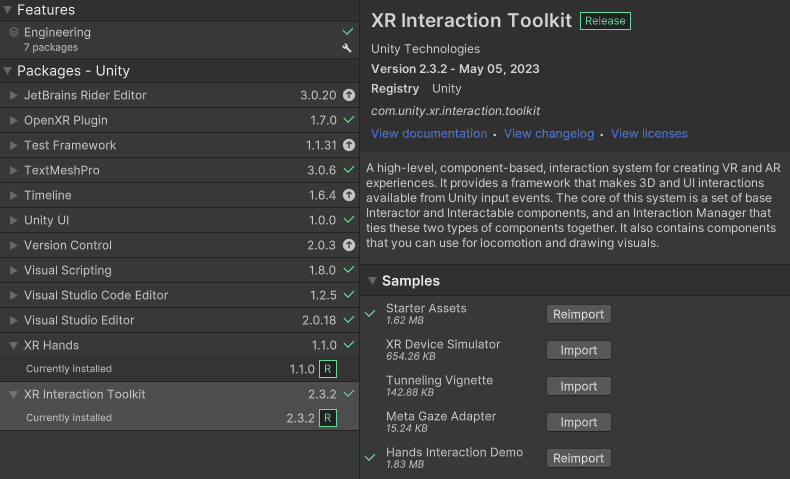
Repeat the same steps to install the other two plugins: XR Interaction Toolkit and XR Hands.
Alternatively, you can manually trigger the plugin installation by adding the following record to the Packages/manifest.json file in your project directory:
"com.unity.xr.hands": "1.1.0",
"com.unity.xr.interaction.toolkit": "2.3.2",
"com.unity.xr.openxr": "1.7.0",
Though, you need to know the exact name of the package and the version number you'd like to add. Also, note that these packages evolve, and what applies in this tutorial for these specific versions might be very different in future versions.
Now, go to Edit → Project Settings and find XR Plug-in Management. Within this settings, enable OpenXR from Plug-in Providers.
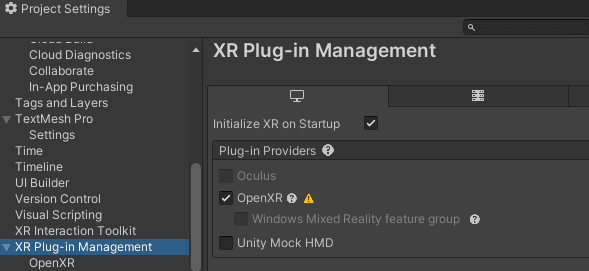
Nested below XR Plug-in Management, you should see OpenXR. Navigate to that section, click on the plus icon in the Interaction Profiles list, and add a controller profile that corresponds to your VR device.
Also, enable the Hand Tracking Subsystem and Meta Hand Tracking Aim by ticking the respective checkboxes in OpenXR Feature Groups.

Finally, locate the Project Validation option below OpenXR. There may be issues that need to be resolved. Simply click on the Fix All button, which will execute the necessary actions.
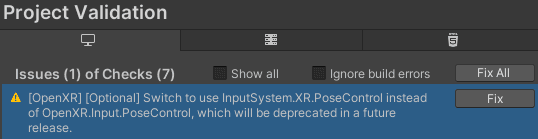 Your might have different issues or none, it depends on versions and your VR device.
Importing Samples
To make our life a bit easier, let's import an XR rig from the Unity sample assets. But first, we need to import them into our project.
Go back to Window → Package Manager and locate the XR Interaction Toolkit again. On the right side, under the Samples section, import the Starter Assets and Hands Interaction Demo. Similarly, from the XR Hands package, import the HandVisualizer sample.
There is an incredibly useful prefab located at Assets/Samples/XR Interaction Toolkit/2.3.2/Hands Interaction Demo/Runtime/Prefabs/Complete XR Origin Hands Set Up.prefab.
In fact, there is also a neat sample scene where you can see this prefab in action. Open Assets/Samples/XR Interaction Toolkit/2.3.2/Hands Interaction Demo/Runtime/HandsDemoScene.unity and give it a try.
 You may see both hands and controllers in the Unity Editor Play Mode. However, when you build your project, only the hands should be visible.
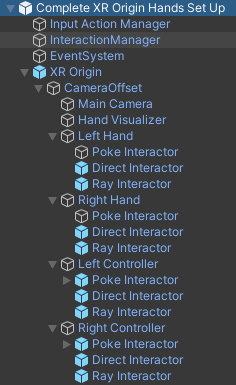
Before we start with porting our calculator for VR environment, let's take a moment to briefly examine the Complete XR Origin Hands Set Up prefab.
Although, as I mentioned earlier, these plugins are subject to change over time, there's no need to delve into every single detail of their implementation. The more pragmatic approach is to first grasp the high-level understanding and then delve deeper as needed.
With that being said, pay attention to the XR Origin its Hands and Controllers Manager component and how the nested child objects, Left Hand, Right Hand, Left Controller, and Right Controller, are assigned as values to four members, divided into two categories: Hand Tracking and Motion Controllers.
Next, notice that each of these four objects contains three additional child objects: PokeInteractor, DirectInteractor, and RayInteractor. As their names imply, these components are used for interacting with objects in the scene. We will soon be using them, after we transform our calculator into an XR interactable object.
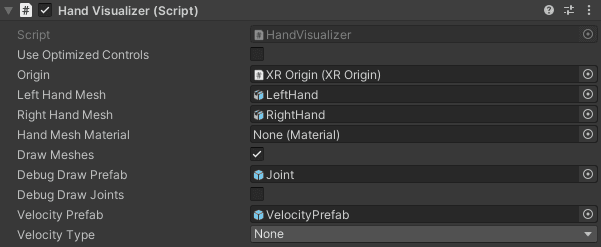
Also, take note of the Hand Visualizer. Here, you have the option to change hand meshes and assign them a specific material.
 Enabling debug draws can be useful for troubleshooting.
Porting Our Calculator
Now, create a new scene and add the Complete XR Origin Hands Set Up prefab to the hierarchy, then place our Calc prefab somewhere you can reach it.
First, let's modify the Key.cs file. Since we will be relying on the poking affordance provided by the XR Toolkit, we only need to implement very simple methods for pressing and releasing a key.
public void PressVRHand()
{
    if (isPressed)
        return;
isPressed = <span class="hljs-literal">true</span>;
OnPressed?.Invoke(token);

}
public void ReleaseVRHand()

{

isPressed = false;

}
Now, unpack the Calc prefab completely by right-clicking on it in the hierarchy and selecting Prefab → Unpack Completely. This will allow us to wire things up differently, eventually resulting in a new prefab.
Next, nest each object its name starts with CalcButton into a new empty game object with a name that starts with PokeButton as shown in the following image.
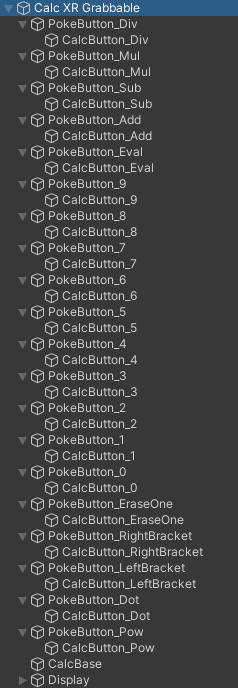 You can also rename the top game object from "Calc" to "Calc XR Grabbable" for easier distinction from the original Calc prefab in the future.
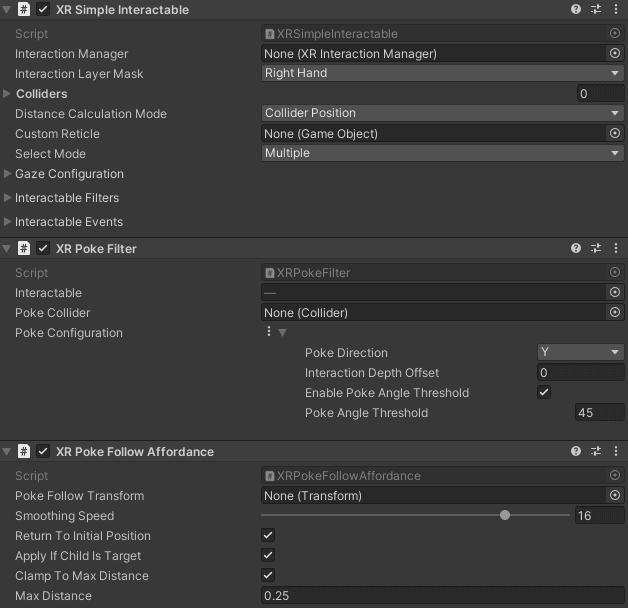
To each PokeButton object, add three components: XR Simple Interactable, XR Poke Filter, and XR Poke Follow Affordance. Now, let's configure these components.
In the Inspector, under XR Simple Interactable, you'll find various events. You can register Hover events directly in the inspector, but you would need to repeat these steps for every PokeButton and its corresponding CalcButton child pair.
That would indeed be a tedious process. Instead, we can add listeners to these events in the Awake function of the Key script.
Similarly, we can assign the BoxCollider of the CalcButton to the Poke Collider property of the XR Poke Filter component and for each XR Poke Follow Affordance component, we can assign the transform component of the corresponding CalcButton to the Poke Follow Transform property.
private void Awake()
{
XRSimpleInteractable interactable = GetComponentInParent<XRSimpleInteractable>();
interactable.hoverEntered.AddListener((args) => { PressVRHand(); });
interactable.hoverExited.AddListener((args) => { ReleaseVRHand(); });
XRPokeFilter filter = GetComponentInParent<XRPokeFilter>();
filter.pokeCollider = GetComponent<BoxCollider>();
XRPokeFollowAffordance affordance = GetComponentInParent<XRPokeFollowAffordance>();
affordance.pokeFollowTransform = transform;
}
For the remaining values that are the same for all the mentioned components on the PokeButtons, you can select them all and set the following in the Inspector:
Poke Directionproperty ofXR Poke FiltertoY.Max Distanceproperty ofXR Poke Follow Affordanceto0.25.
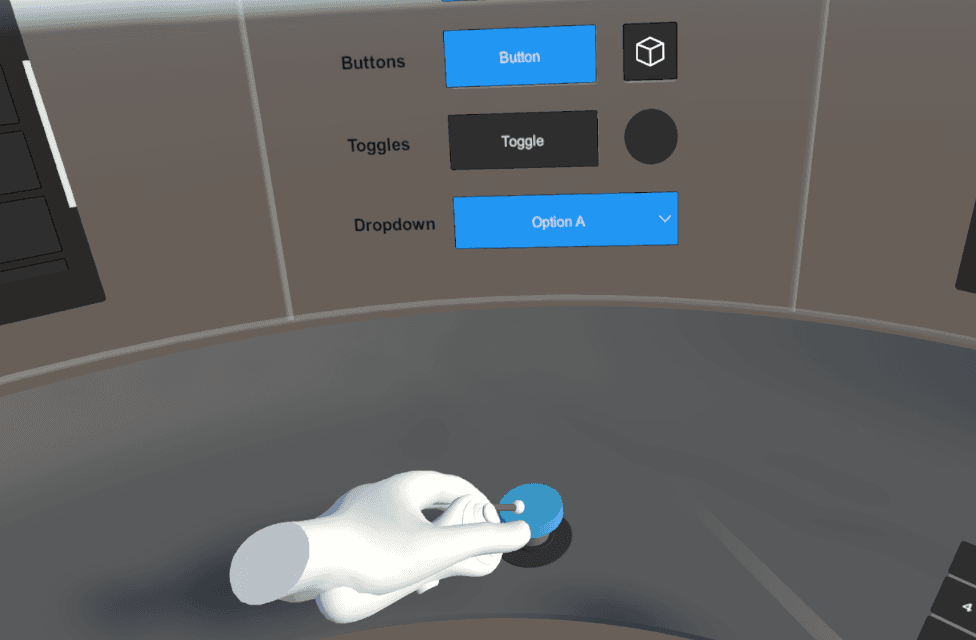
Now, with your VR hands or controller, you can interact with the buttons by pushing them, and these interactions will trigger the corresponding events in our calculator logic.
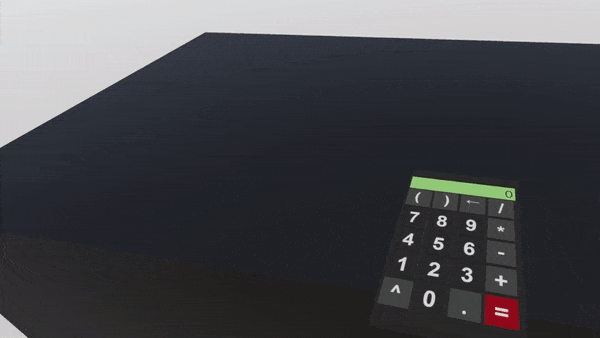
The final step is to make the entire calculator object grabbable. This can be easily achieved by adding a new BoxCollider to the top Calc game object and making it slightly larger to encompass the entire object.
 The largest green box represents our grabbable collider, and the red lines indicate the direction of the poke follow affordance.
Then add an XR Grab Interactable component to the Calc game object. In the Inspector, add a new element to the Colliders array and assign the newly created BoxCollider to it.
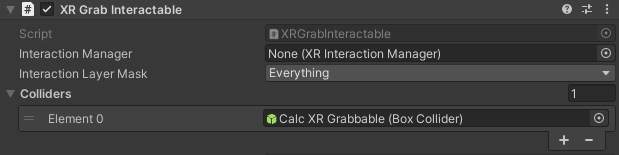
And that's it! You can now simply drag and drop the entire Calc game object from the hierarchy to the project content area to create a new prefab.
If you haven't achieved the desired end goal, you can always refer to the second example project available on GitHub. While the first example captures the state after the part II.
Conclusion
Over the course of these three posts, you have gained a lot of valuable knowledge, especially if you followed along which is always a great way to solidify freshly gained knowledge.
To further solidify and event expand your knowledge, I recommend exploring all the samples that comes with the XR Interaction Toolkit, reading the documentation, and most importantly, experimenting and building things on your own.
If you enjoyed this tutorials, follow me on Twitter, where you can find not only more of my tutorials, but also other interesting things related to game development.


