Procedural Generation Of Mazes In Unreal Engine, Part II
We loop through all the eight around X and Y plus the one at the X, Y position from our maze array and compare them with the elements in the Pattern array. We increment Count when an element in the maze matches with the one at the same position in the Pattern or the element in Pattern is 5. 0 units. h. h.
Today, we'll use pattern matching based on a technique I learned in Master Procedural Maze & Dungeon Generation course by Penny de Byl. Although that course is Unity-oriented, the underlying principle is universal.
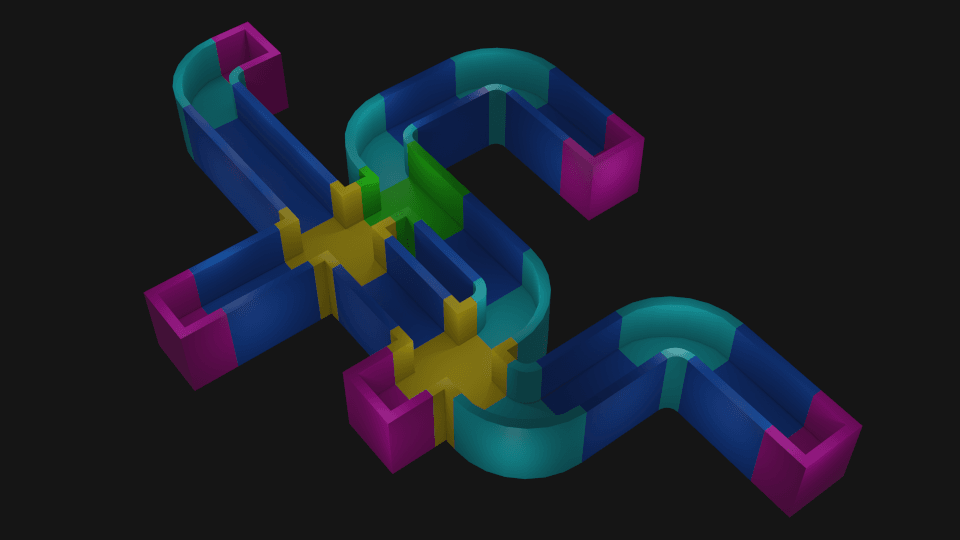
If you followed along in the last part, and you want to follow along today too, download these five FBX models. We're going to build the entire maze just from them.
 Five modular pieces. That's all that we need to build a maze.
Look at those five pieces closely, and you'll see that we can just by duplicating, rotating, and joining them together, even manually, build a maze of any size.
 A small maze assembled by hand from modular pieces in Blender. You can rewrite the code from this tutorial series to Python and procedurally generate mazes in Blender! The underlying logic would be the same.
Before we do that programmatically, we need to turn these meshes into Unreal assets. Then we will create five Blueprint Actors with Static Mesh components, each for one of these pieces.
Preparing UAssets
Importing FBX meshes to Unreal Engine is straightforward. In the Content Browser, let's create a new folder. We're going to name it Models. Then, we'll drag and drop the five FBX files inside.
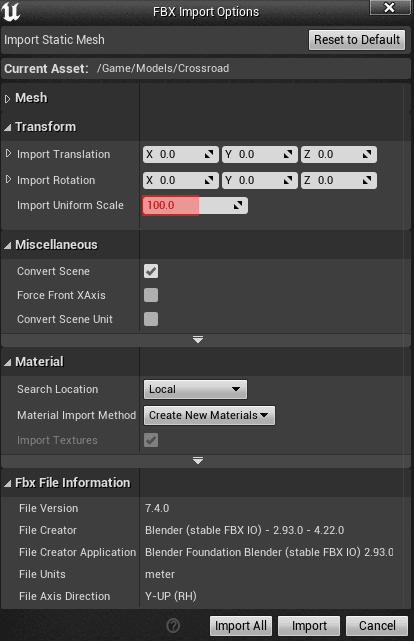 We keep all settings at their default values, except the Import Uniform Scale, which we set to 100.0 units.
All we need to change in the FBX Import Option windows that pops up is the Import Uniform Scale, which we set to 100.0 units. I'll explain why later.
 Maze pieces imported to Unreal Engine as Uassets. You can find them in (project folder)/Content/Models. These files have .uasset extension.
 If you want, you can also create materials for those pieces. Although I did that in the example project, I'm not going to cover it in this tutorial. It's too much outside the scope of our main topic, which is procedural maze generation.
You can also set colliders for these assets if you wish. You can do that in the Edit window that pops up when you double-click an asset. Again, I'm not going to go through too many details about collisions.
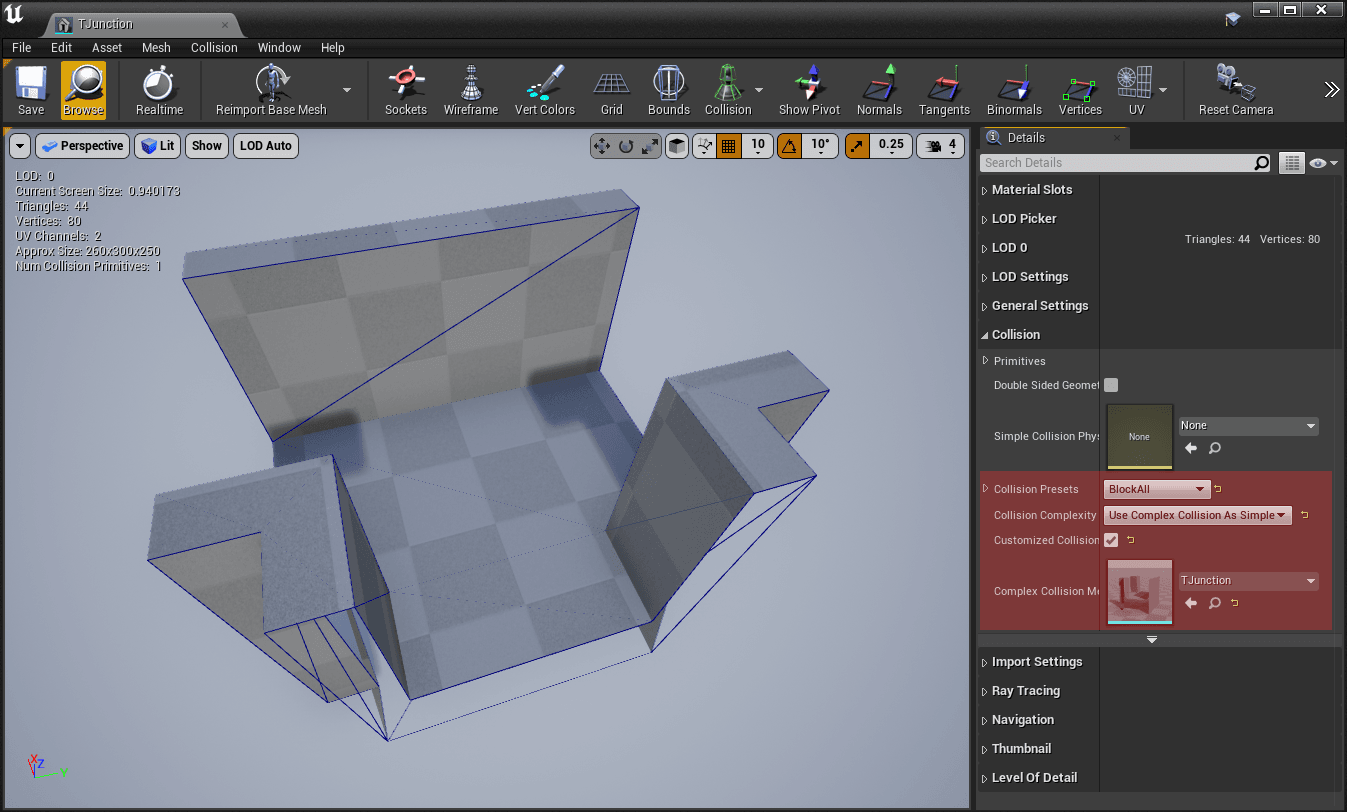 You can use the same meshes as colliders for complex collisions, which is not a good practice. But for a placeholders, it's good enough.
When we now have our pieces imported. In the Content Browser, let's step outside the Models folder, right-click, and from the context menu select Blueprint Class. The Parent Class Pick window pops up. We're going to pick Actor.
 An Actor is an object that can be placed or spawned in the world. That's what we need.
Let's name the Actor BP_MazePiece_Crossroad. Then we double-click it to open the Blueprint Editor. Here, in the top left corner, we click on "Add component..." and add a Static Mesh component.
When we select the newly added Static Mesh component in the Components tab, we can, on the right side of the window, in the Details tab, assign the Crossroad from our Models folder as Static Mesh. We can also add material if we wish. I leave it up to you.
 The quickest way to assign an asset to a compatible slot is by clicking the small left-pointing arrow while you have it selected in the Content Browser.
We hit Compile in the toolbar on top, press Ctrl+S to save, and we have our job here done. We can close the Blueprint Editor. Next, we need to do the same steps for the four remaining pieces, Dead End, Straight, T Junction, and Turn.
 All our five actors in the Content Browser.
Continue With AMazeGenerator Class
When we have our assets ready, it's time to open our AMazeGenerator Actor class to continue with the coding part.
Let's briefly look at what we've done last time. We implemented a recursive Step function with an algorithm that creates a memory representation of a maze as an array of numbers. These numbers are either 1 or 0, 1 means wall, and 0 means a path.
We also declared some properties. These are StartX, and StartY, a starting point for our Step function, Width, and Height to set dimensions of our maze.
That is the place from where we're going to continue. First, in the public section in AMazeGenerator.h, let's add more properties decorated with UPROPERTY(EditAnywhere) macro.
UPROPERTY(EditAnywhere)
    int32 Scale = 300;
UPROPERTY(EditAnywhere)

TSubclassOf<AActor> StraightPiece;
UPROPERTY(EditAnywhere)

TSubclassOf<AActor> TJunctionPiece;
UPROPERTY(EditAnywhere)

TSubclassOf<AActor> CrossroadPiece;
UPROPERTY(EditAnywhere)

TSubclassOf<AActor> TurnPiece;
UPROPERTY(EditAnywhere)

TSubclassOf<AActor> DeadEndPiece;
We'll be getting back to those properties of type TSublassOf<Actor>, but you probably already know why we have them since we just prepared our five Actors from modular pieces.
The one I'd like to stop for a while with is the first one, the Scale, which is by default set to 300. Look at the following top-view picture of our modular pieces.
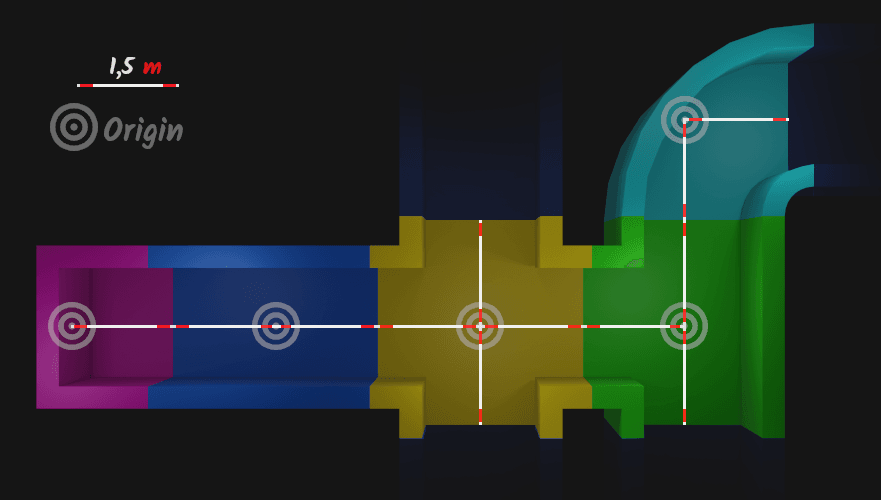 Our modular pieces must be precise. The distance from the origin to an open edge is exactly 1,5 meters.
You can see that every piece has a distance of 1,5 meters from the origin to each open edge on a horizontal plane.
Or you can also say the distance between opposite open edges is 3 meters. It's true for all pieces, except for dead-ends and turns, since turn doesn't have opposite ends and dead-end has just one.
Also, the distance between any two origins is 3 meters. It will be constant throughout the entire maze.
When I was making these pieces in Blender, I had one unit set to one meter, but 1 unit in Unreal Engine, a base unit is 1 centimeter. When we imported our FBX models, we've set Import Uniform Scale to 100 because 1 meter is 100 centimeters.
We've set the Scale property in AMazeGenerator.h is to 300 centimeters because we want our maze generator to place those pieces 3 meters apart from each other.
Now, let's declare a few new functions in the protected section of AMazeGenerator.h.
void Draw() const;
void PlacePiece(int32 X, int32 Y, float Yaw, TSubclassOf<AActor> Piece) const;
bool IsPatternMatching(int32 X, int32 Y, TArray<int8> Pattern) const;
In a nutshell, the Draw function will loop through our maze array. We'll be testing in IsPatternMatching "blocks" of nine (3 times 3) 1s and 0s from that maze array against patterns of the same size. If we'll have a match, the PlacePiece function places and rotates the piece accordingly.
I'll explain how these functions work in more detail on the fly. Let's now, under those functions define our matching patterns.
// Straight
TArray<int8> HorizontalStraightPattern = { 5, 1, 5,
                                           0, 0, 0,
                                           5, 1, 5 };
TArray<int8> VerticalStraightPattern = { 5, 0, 5,

1, 0, 1,

5, 0, 5 };
// T Junctions

TArray<int8> TJunctionUpPattern = { 1, 0, 1,

0, 0, 0,

5, 1, 5 };
TArray<int8> TJunctionDownPattern = { 5, 1, 5,

0, 0, 0,

1, 0, 1 };
TArray<int8> TJunctionLeftPattern = { 1, 0, 5,

0, 0, 1,

1, 0, 5 };
TArray<int8> TJunctionRightPattern = { 5, 0, 1,

1, 0, 0,

5, 0, 1 };
// Crossroad

TArray<int8> CrossroadPattern = { 1, 0, 1,

0, 0, 0,

1, 0, 1 };
// Turns

TArray<int8> TurnLeftUpPattern = { 1, 0, 5,

0, 0, 1,

5, 1, 5 };
TArray<int8> TurnLeftDownPattern = { 5, 1, 5,

0, 0, 1,

1, 0, 5 };
TArray<int8> TurnRightUpPattern = { 5, 0, 1,

1, 0, 0,

5, 1, 5 };
TArray<int8> TurnRightDownPattern = { 5, 1, 5,

1, 0, 0,

5, 0, 1 };
// Dead ends

TArray<int8> DeadEndUpPattern = { 5, 0, 5,

1, 0, 1,

5, 1, 5 };
TArray<int8> DeadEndDownPattern = { 5, 1, 5,

1, 0, 1,

5, 0, 5 };
TArray<int8> DeadEndLeftPattern = { 5, 1, 5,

0, 0, 1,

5, 1, 5 };
TArray<int8> DeadEndRightPattern = { 5, 1, 5,

1, 0, 0,

5, 1, 5 };
The code is formatted so that the pattern would be more obvious. You might be confused why there are also 5s in there. I'll explain that soon. For now, look at those patterns like 5 and 1 is a wall and 0 is a path.
Look closely at this picture and compare the positions of 1s and 0s with those of the modular pieces.
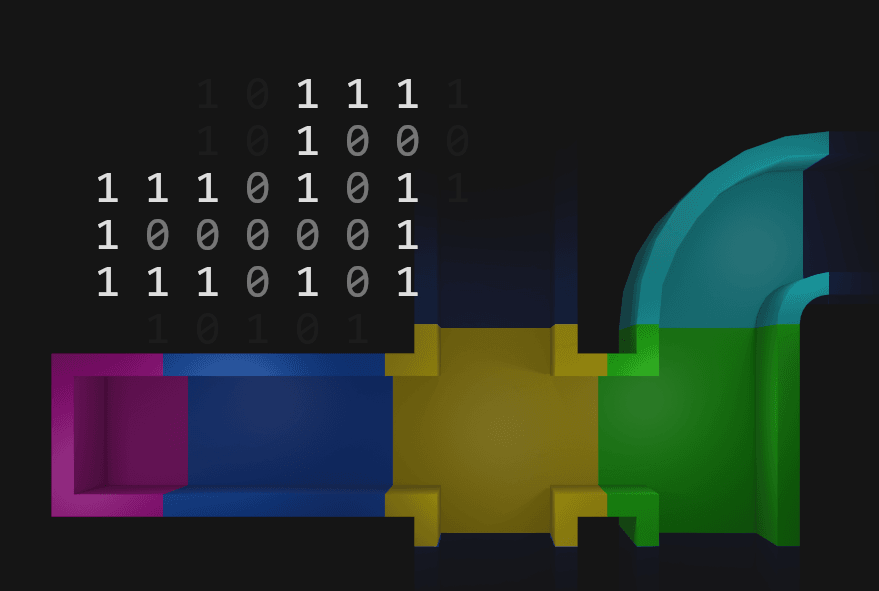 The patterns in a maze, and pieces positioned and rotated according to it.
 Now let's go to the AMazeGeneration.cpp file and implement the Draw function. I'd place it below the Step function.
In this function, we loop through every element in our maze array. For each, we test if there is a matching pattern. We defined those patterns a moment ago in the header file.
void AMazeGenerator::Draw() const
{
    for (int32 x = 1; x < Width - 1; x++)
    {
        for (int32 y = 1; y < Height - 1; y++)
        {
            // Straight
            if      (IsPatternMatching(x, y, HorizontalStraightPattern)) { PlacePiece(x, y, 90.f, StraightPiece); }
            else if (IsPatternMatching(x, y, VerticalStraightPattern))   { PlacePiece(x, y,  0.f, StraightPiece); }
        // Turns
        else if (IsPatternMatching(x, y, TurnLeftUpPattern))    { PlacePiece(x, y, 0.f, TurnPiece);   }
        else if (IsPatternMatching(x, y, TurnLeftDownPattern))  { PlacePiece(x, y, 90.f, TurnPiece);  }
        else if (IsPatternMatching(x, y, TurnRightUpPattern))   { PlacePiece(x, y, -90.f, TurnPiece); }
        else if (IsPatternMatching(x, y, TurnRightDownPattern)) { PlacePiece(x, y, 180.f, TurnPiece); }

        // T Junctions
        else if (IsPatternMatching(x, y, TJunctionUpPattern))    { PlacePiece(x, y, -90.f, TJunctionPiece); }
        else if (IsPatternMatching(x, y, TJunctionDownPattern))  { PlacePiece(x, y,  90.f, TJunctionPiece); }
        else if (IsPatternMatching(x, y, TJunctionLeftPattern))  { PlacePiece(x, y,   0.f, TJunctionPiece); }
        else if (IsPatternMatching(x, y, TJunctionRightPattern)) { PlacePiece(x, y, 180.f, TJunctionPiece); }

        // Dead ends
        else if (IsPatternMatching(x, y, DeadEndUpPattern))    { PlacePiece(x, y,  90.f, DeadEndPiece); }
        else if (IsPatternMatching(x, y, DeadEndDownPattern))  { PlacePiece(x, y, -90.f, DeadEndPiece); }
        else if (IsPatternMatching(x, y, DeadEndLeftPattern))  { PlacePiece(x, y, 180.f, DeadEndPiece); }
        else if (IsPatternMatching(x, y, DeadEndRightPattern)) { PlacePiece(x, y,   0.f, DeadEndPiece); }

        // Crossroad
        else if (IsPatternMatching(x, y, CrossroadPattern)) { PlacePiece(x, y, 0.f, CrossroadPiece); }
    }
}

}
Once we have a match, we don't need to perform more tests. That's why the order of the conditional statements is not random. Those where the probability for the match is higher come first.
We delegated logic for pattern matching and placing to other functions. Let's now implement below the Draw the first of them, IsPatternMatching.
bool AMazeGenerator::IsPatternMatching(int32 X, int32 Y, TArray<int8> Pattern) const
{
    int Count = 0;
    int i = 0;
    for (int y = 1; y > -2; y--)
    {
        for (int x = -1; x < 2; x++)
        {
            if (Pattern[i] == Maze.Get(X + x, Y + y) || Pattern[i] == 5)
            {
                Count++;
            }
        i++;
    }
}

return Count == 9;

}
From this function, we want an answer to this question. Does the 3 x 3 "block" of 1s and 0s around X and Y match the Pattern parameter?
The pattern matches when all elements are the same. We loop through all the eight around X and Y plus the one at the X, Y position from our maze array and compare them with the elements in the Pattern array.
When an element in this 3 x 3 "block" from our maze is the same as the element in the Pattern, we increment the counter (Count). In the end, we have a match only when the counter reaches 9, which means that all nine elements must have been the same.
Is that correct? Almost. But there's a catch. If we'd do this exact pattern matching, the final output would look like this.
 The exact 1:1 pattern matching is not the right way.
That's not what we want. However, look at the image above again and notice what pieces are missing. It's not entirely random. It seems like we're mostly missing those that should be between the other two.
Let's once again use the image with pieces rendered from the top. We'll use colors to highlight parts of the maze array we're comparing for pattern matching.
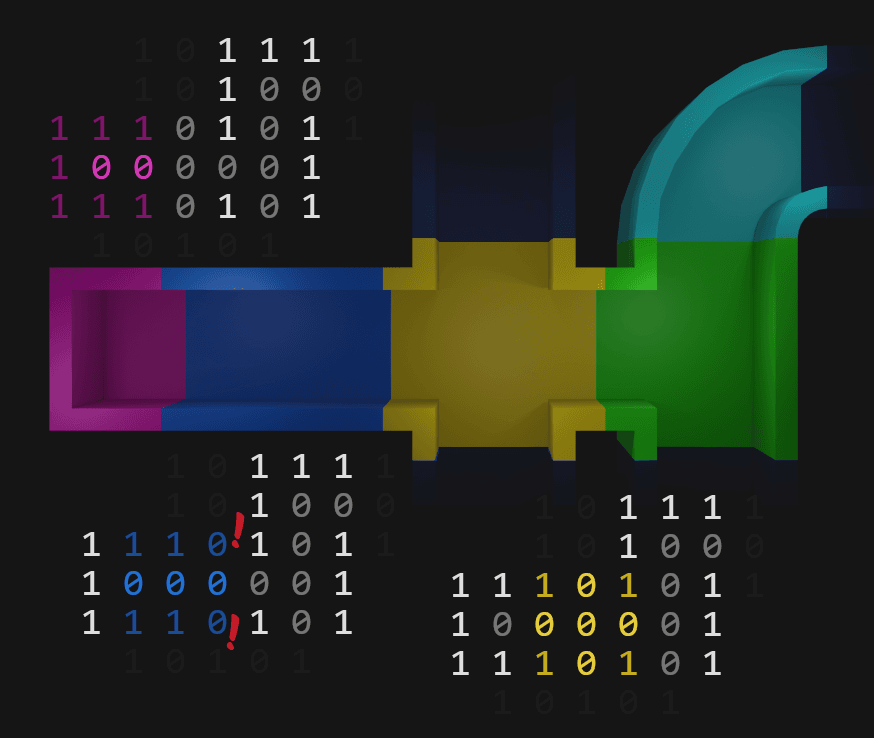 When applying pattern matching, we move through our maze one step in X and one step in Y direction.
 The dead-end matches and the crossroad too, but look what's between them.
1 1 0
0 0 0
1 1 0
We have no such pattern defined in AMazeGenerator.h, but we have this one.
5 1 5
0 0 0
5 1 5
And the number 5 here is something we call a wildcard. It could be any number, but the number 5 is visually very different from 1 and 0. You can read the pattern like this:
Whatever  Wall  Whatever
Path      Path      Path
Whatever  Wall  Whatever
Let's look back inside the nested for loop in IsPatternMatchihg. We increment Count when an element in the maze matches with the one at the same position in the Pattern or the element in Pattern is 5.
if (Pattern[i] == Maze.Get(X + x, Y + y) || Pattern[i] == 5)
{
    Count++;
}
Scroll up a bit and look again at all the patterns we defined in AMazeGenerator.h. Notice where we have the 5s.
We're almost at the end. All we need to do in AMazeGenerator.cpp is to implement the PlacePiece function. That's very simple. It just spawns given Piece at position X * Scale, and Y * Scale (Scale is 300 centimeters), rotated around the Z-axis (which in Unreal Engine's left-handed, z-up coordinate system corresponds with Yaw) of a given Yaw angle (in degrees).
void AMazeGenerator::PlacePiece(int32 X, int32 Y, float Yaw, TSubclassOf<AActor> Piece) const
{
FVector Location(X * Scale, Y * Scale, 0);
FRotator Rotation(0, Yaw, 0);
FActorSpawnParameters SpawnInfo;
GetWorld()->SpawnActor<AActor>(Piece, Location, Rotation, SpawnInfo);
}
And also don't forget to call the Draw function at the end of the BeginPlay.
void AMazeGenerator::BeginPlay()
{
    Super::BeginPlay();
Maze.Init();
Step(StartX, StartY);
Draw();

}
Putting It All Together
We have our MazeGenerator implemented. We have prepared assets. Now it's time to put it together and let the Unreal Engine generate a maze for us.
In the Content Browser, right-click and add another Blueprint Class. This time expand All classes and derive it from our MazeGenerator Actor class.
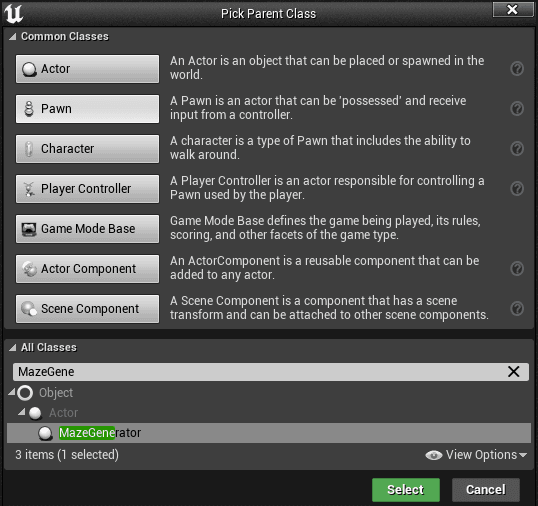 BP_MazeGenerator is a BluePrint class we're going to place to our level.
Name it BP_MazeGenerator and place it somewhere in the level. Then select the BP_MazeGenerator instance in the World Outliner tab, and below in the Details tab, assign modular pieces each to its slot.
 Try also different values for Width and Height.
That was the last step. If you hit Compile and Play, you should see a maze similar to this one.
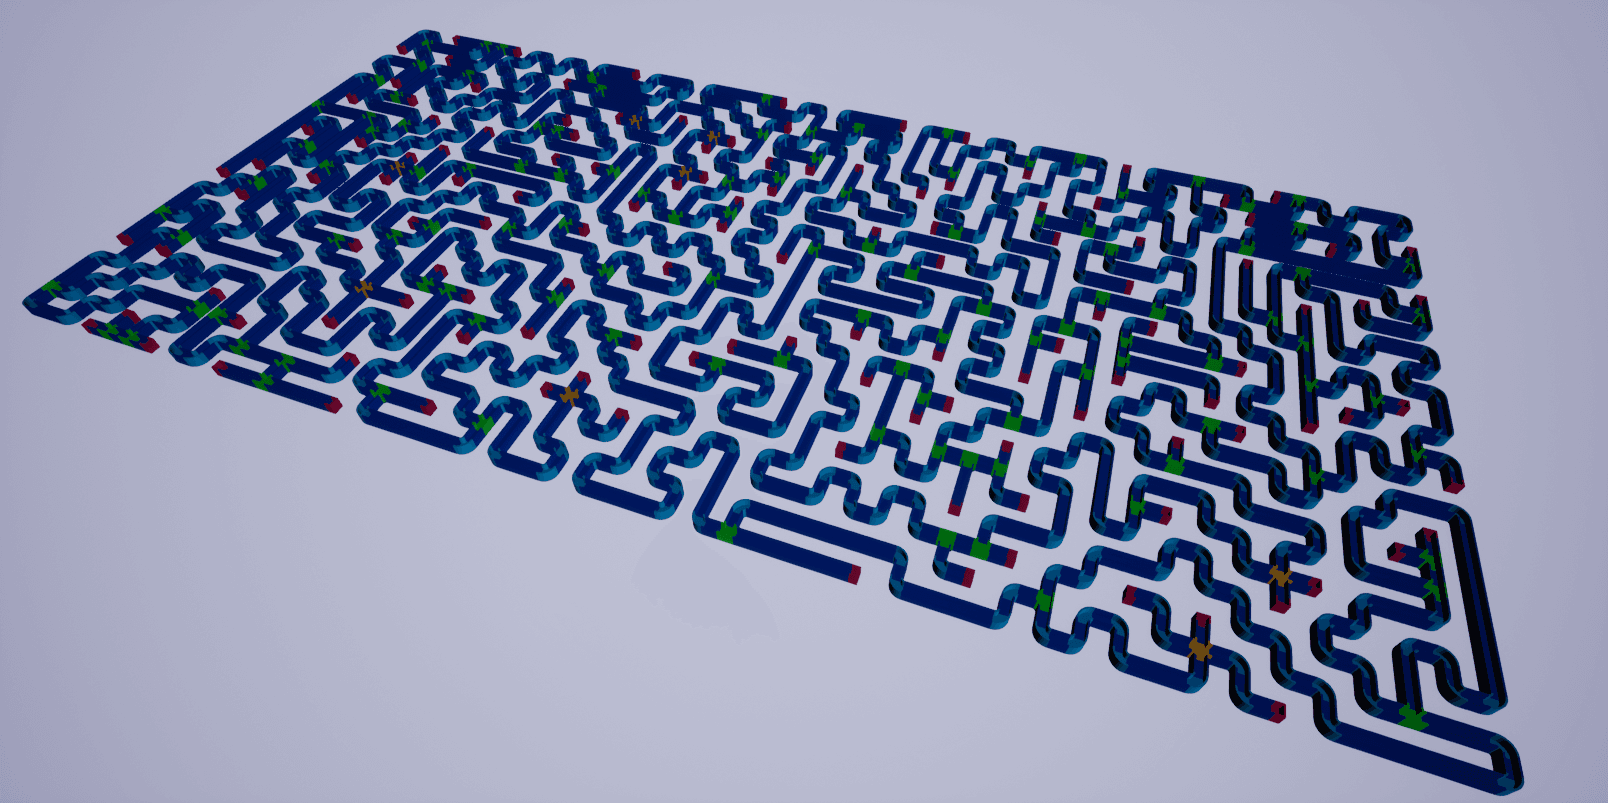 Width = 100, Height = 50
 One final tip. If you're going to make your modular pieces, import FBX models from this tutorial Blender (or other 3D content creation tool) and use them as guides for dimensions, orientation, and origin placement.
Conclusion
In the previous part, we've created a maze memory representation using a simple recursive algorithm. That representation is an array filled with 1s and 0s, where 1 means a wall, 0 is a path.
Today, we've seen how to build a maze from just five modular pieces based on that memory representation, using pattern matching.
If you've followed along and the result is not what you've expected, you can always refer to the example project.
I hope you like what you've learned. Most of it is universal and transferable to other environments. I, for example, used the same algorithm for maze generation in this project with Wolfenstein 3D style rendering, which is something that has nothing to do with Unreal Engine.
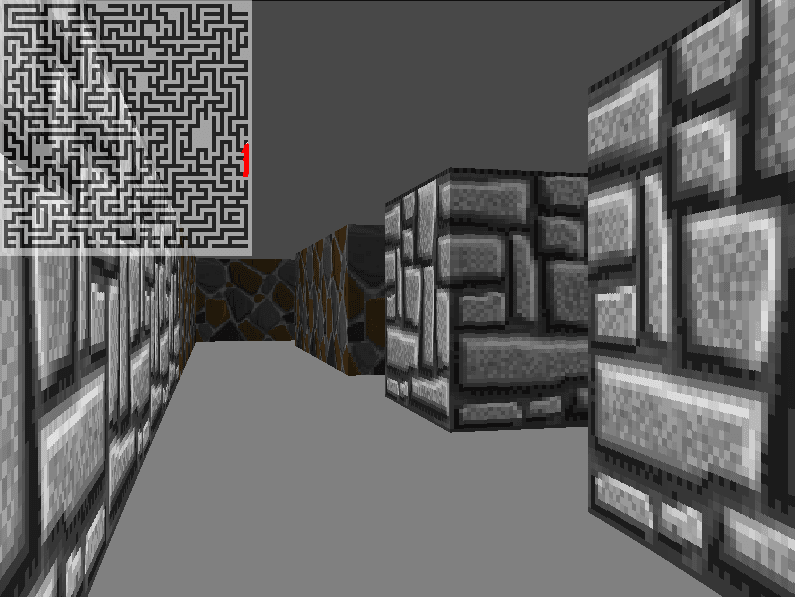 You can use a lot of what we've covered in a completely different environment.

