
Make a fully functional calculator in Unity not only for VR, Part I
The isPressed flag helps us to prevent our button from being repeatedly pressed while a current press is still in progress
At the beginning of a push, a current position will be assigned to the initialPosition and the targetPosition will be calculated based on the initialPosition and pushOffset. 3. 3.
In this first part of the three-part tutorial, I'll show you how to build a fully functional calculator prefab in Unity. You will learn how to animate a button press using coroutines, work with Unity events and utilize TextMesh Pro.
In the second part, you'll learn how to evaluate mathematical expressions. We'll build a tokenizer, recursive descent parser, and abstract syntax tree (AST) together. If this is your first time encountering these terms, you are about to learn something very neat. At the end the second part, our calculator will be fully functional.
In the third and final part, we will port our calculator to a VR environment. I'll show you how to work with the OpenXR, XR Interaction Toolkit, and XR Hands plugins and you'll learn how to create an object that is both grabbable and interactable.
 A fully functional VR calculator in Unity; the end goal of this tutorial series.
Preparing a new Unity project
If you want to follow along, create a new Unity project using a core 3D template. I recommend using Unity 2021.3.24f1. While it should work with newer versions as well, 2021.3.24f1 is the safest bet for compatibility.
I have also prepared a starter package for you, which includes meshes, textures, materials, and a prefab with an assembled calculator using these assets. Download calc.unitypackage from here and import it to your project.
Locate the Calc.prefab asset and place it into your scene. Once you have done that, you should be immediately prompted to import the TextMesh Pro package. In the TMP Importer window, click on "Import TMP Essentials".
Finally, expand the Calc game object in the Hierarchy tab. Select the Display child object and assign the Main Camera to the Event Camera property of the Canvas component.
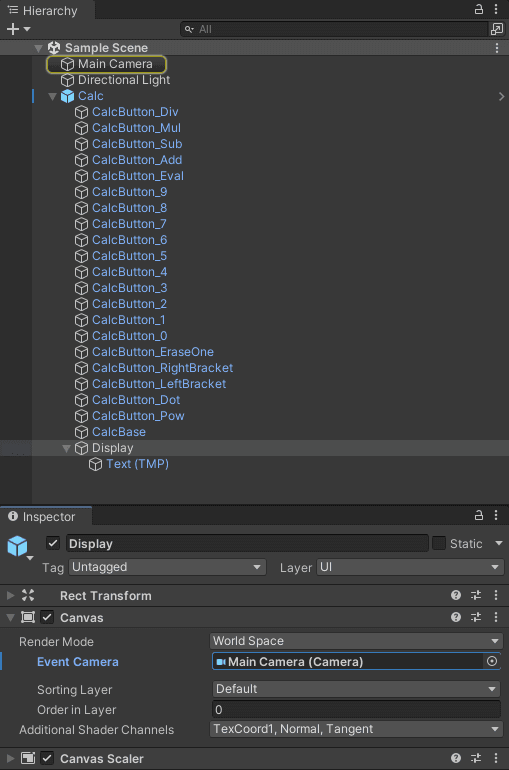 Note that the Render Mode is set to World Space. For more information about creating a World Space UI, you can refer to the Creating a World Space UI page in the Unity Docs.
In our particular case, since our display won't be receiving any UI events, we don't need to assign an Event Camera. However, it is generally a good practice to ensure that our project does not have any warnings.
Before we start coding, let's take a brief look at the Calc prefab. It's composed of a CalcBase object, which consists of a CalcBase mesh and a BoxCollider. In addition, prefab has twenty individual buttons, each with a CalcButton mesh and also a BoxCollider. Last but not least, it has the Display child object, which, in turn, contains the Text (TMP) child object.
Each button in the prefab has its own material, but they all share the same CalcButtons.png texture. The texture contains various symbols, and each button displays a different symbol by using different UV coordinates.
The Display child object consists mainly of a Canvas component, and its child object Text (TMP) has a TextMesh component that we will use to display expressions and results.
Key Script
With our assets prepared, let's dive into implementing the logic. We will start by writing a Key script that will define the behaviour of an individual button for our calculator. First, let's add a couple of member variables.
using System;
using System.Collections;
using UnityEngine;
using UnityEngine.Events;
public class Key : MonoBehaviour
{
[SerializeField]
private char token;
<span class="hljs-keyword">private</span> <span class="hljs-built_in">float</span> pushOffset = <span class="hljs-number">0.25f</span>;
<span class="hljs-keyword">private</span> <span class="hljs-built_in">float</span> movementSpeed = <span class="hljs-number">1.5f</span>;
<span class="hljs-keyword">private</span> <span class="hljs-built_in">bool</span> isPressed;
<span class="hljs-keyword">private</span> Vector3 targetPosition;
<span class="hljs-keyword">private</span> Vector3 initialPosition;
<span class="hljs-keyword">public</span> UnityEvent<<span class="hljs-built_in">char</span>> OnPressed;</div></code><button aria-label="Copy code" aria-pressed="false" class="flex justify-center group items-center outline-hidden bg-turquoise shadow-button-secondary fill-shadow-grey hover:bg-fresh-green hover:shadow-button-secondary-hover active:bg-dark-teal active:shadow-button-secondary-active active:fill-ivory transition-all cursor-pointer disabled:cursor-auto select-none absolute right-4 top-4 h-10 w-10"><svg xmlns="http://www.w3.org/2000/svg" height="20px" width="20px" viewBox="0 -960 960 960" fill="inherit" class="group-aria-pressed:hidden"><path d="M360-240q-33 0-56.5-23.5T280-320v-480q0-33 23.5-56.5T360-880h360q33 0 56.5 23.5T800-800v480q0 33-23.5 56.5T720-240H360Zm0-80h360v-480H360v480ZM200-80q-33 0-56.5-23.5T120-160v-520q0-17 11.5-28.5T160-720q17 0 28.5 11.5T200-680v520h400q17 0 28.5 11.5T640-120q0 17-11.5 28.5T600-80H200Zm160-240v-480 480Z"></path></svg><svg xmlns="http://www.w3.org/2000/svg" height="20px" width="20px" viewBox="0 -960 960 960" fill="inherit" class="hidden group-aria-pressed:block"><path d="m382-354 339-339q12-12 28-12t28 12q12 12 12 28.5T777-636L410-268q-12 12-28 12t-28-12L182-440q-12-12-11.5-28.5T183-497q12-12 28.5-12t28.5 12l142 143Z"></path></svg></button></pre>Encapsulating member variables improves data integrity and protects them from direct manipulation, promoting better code maintainability and reducing potential bugs.<p>To hold a token for each individual key in the Inspector, we will create a private member variable. Instead of making it a public property and breaking the principle of encapsulation, we will use the <code>[SerializeField]</code> attribute to expose it to the Inspector.</p><p>The <code>pushOffset</code> sets the distance our key moves within the base when pressed, while the <code>movementSpeed</code> sets how quickly this movement occurs. </p><p>The <code>isPressed</code> flag helps us to prevent our button from being repeatedly pressed while a current press is still in progress</p><p>At the beginning of a push, a current position will be assigned to the <code>initialPosition</code> and the targetPosition will be calculated based on the <code>initialPosition</code> and <code>pushOffset</code>.</p><p>The <code>OnPressed</code> Unity Event will be triggered once the key reaches its target position, passing the token as an event argument. Now, let's write our Press method.</p><pre class="flex flex-row w-full items-start justify-between !p-5 relative break-words whitespace-break-spaces"><code class="hljs language-C# flex flex-col w-full !pr-11 break-word"><div style="white-space: inherit;"><span class="hljs-function"><span class="hljs-keyword">public</span> <span class="hljs-keyword">void</span> <span class="hljs-title">Press</span>()</span>
{
if (isPressed)
return;
isPressed = <span class="hljs-literal">true</span>;
initialPosition = transform.position;
targetPosition = <span class="hljs-keyword">new</span> Vector3(transform.position.x, transform.position.y - pushOffset, transform.position.z);
StartCoroutine(MoveTo(targetPosition, MoveBack, <span class="hljs-literal">true</span>));
}
To prevent the method from being called repeatedly, we implemented a simple safeguard at the beginning of the Press method. After that, we'll set the initial and target positions as previously mentioned, and start a coroutine to initiate the movement.
Let's implement the MoveTo method that we're passing to StartCoroutine.
private IEnumerator MoveTo(Vector3 position, Action onComplete, bool invokeOnPressed)

{

while (Vector3.Distance(transform.position, position) > 0.001f)

{

transform.position = Vector3.MoveTowards(transform.position, position, movementSpeed * Time.deltaTime);

yield return new WaitForEndOfFrame();

}
onComplete?.Invoke();

<span class="hljs-keyword">if</span> (invokeOnPressed)
{
    OnPressed?.Invoke(token);
}

}
First, we move the game object towards its target position, waiting in each iteration of the while loop until the end of the current frame. To ensure smooth and consistent movement regardless of the frame rate, we multiply our movementSpeed by Time.deltaTime.
After our game object reaches its target destination, with an acceptable error margin of 0.001f, we check if the onComplete delegate is not null using the null-conditional operator (.?). If it is not null, we invoke the delegate.
You can read more about Action delegates at learn.microsoft.com/en-gb/dotnet/api/system.action.
If the invokeOnPressed flag is set to true and the OnPressed delegate is not null, we invoke it with the token parameter. Later on, we will wire this from our Display script, to receive and print tokens associated with individual keys.
Note that we passed the MoveBack method as the onComplete argument. The MoveBack is simple, and mostly reuses existing logic.
private void MoveBack()

{

StartCoroutine(MoveTo(initialPosition, Unlock, false));

}
We run the MoveTo method again as a coroutine, but this time we're moving back to the initial position and invoking the Unlock method upon completion. However, we don't want to invoke the OnPressed delegate this time.
The last piece of a puzzle is the Unlock method, which simply sets isPressed back to false.
private void Unlock()

{

isPressed = false;

}
If you're a beginner programmer, you might be a bit confused now. If so, just slowly read the code and go line-by-line as you'd be a computer executing it.
This concludes our Key script. Now, get back to Unity Editor and attach it to all child objects of Calc game object which name starts with CalcButton.
Now, go through each button that represents numbers from 0 to 9, as well as symbols +, -, , /, ^, (, ), and ., and assign a corresponding character as the value of the Token property in the Inspector.
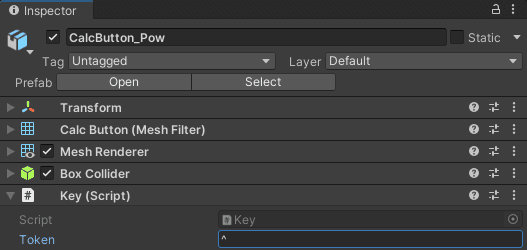 Assign
 ^ as a value of Key.token on CalcButton_Pow. CalcButton_Div, _Mul, _Sub, _Add, _LeftBracket, _RightBracker, and _Dot get /, -, +, (, ) and . respectively.Key script on CalcButon_EraseOne and CalcButton_Eval does not need any token.
Display script
Now, create a new script and attach it to the "Display" child object. Let's begin by defining a few member variables.
using System;

using System.Collections.Generic;

using TMPro;

using UnityEngine;
public class Display : MonoBehaviour

{

private TextMeshProUGUI textMesh;

private bool inFaultState = false;

private bool lastOpIsEvaluation = false;
Boolean variables, inFaultState and lastOpIsEvaluation, will be useful for clearing the display when the backspace key (←) is pressed in a different cases:
- When our future parser throws an exception due to an invalid expression like
2+*2, theinFaultStatevariable will be set to true and display shows "Invalid Syntax". Pressing the backspace key in this situation will clear the entire display. - When the last operation was evaluation, such as typing
256+256and pressing=, resulting in512displayed, pressing the backspace key will clear the entire display. - When you type, for example digits
5,1and2and press backspace, only the last digit will be removed, resulting in51displayed.
In the Awake function, we will assign a reference to the TextMeshProUGUI component from the child object.
private void Awake()

{

textMesh = GetComponentInChildren<TextMeshProUGUI>();

}
Now, let's implement a Type method. This function will be invoked on the OnPressed events of keys that have tokens.
public void Type(char c)
{
lastOpIsEvaluation = false;
<span class="hljs-keyword">if</span> (inFaultState)
{
Clear();
inFaultState = <span class="hljs-literal">false</span>;
}
<span class="hljs-keyword">if</span> (textMesh.text == <span class="hljs-string">"0"</span> && IsNumberOrBracket(c))
{
textMesh.text = <span class="hljs-built_in">string</span>.Empty;
}
textMesh.text += c;
}
Before appending a new character to our display, we always reset the lastOpIsEvaluation flag. Following that, we check if the inFaultState flag is true. If it is, we clear the display and reset the inFaultState flag.
Finally, if the current text on the display is 0 and the input character is a number or a bracket, we first wipe everything from the display before appending the input character.
That's because we want to prevent undesired concatenation of characters. If we didn't perform the clear action in this scenario, we might end up with 01 or 0( on the display, which is not the intended behaviour.
However, in the case of the input character being -, we want to allow it to be appended to the 0 on the display. For example, if we press -, followed by another digit like 2, we get 0-2, which is a valid expression.
Let's now implement helper methods, Clear and IsNumberOrBracker.
private void Clear()

{

textMesh.text = "0";

}
private bool IsNumberOrBracket(char c)

{

return double.TryParse(c.ToString(), out _) || c == '(' || c == ')';

}
double.TryParse method returns false when the parsing to double fails, indicating that the input is not a valid number.Our Display class requires two additional methods. One of these methods will be invoked by the OnPressed event from a Key that is attached to the CalcButton_Backspace.
public void EraseOne()

{

if (inFaultState || lastOpIsEvaluation || textMesh.text.Length == 1)

{

Clear();

return;

}
textMesh.text = textMesh.text.Remove(textMesh.text.Length - <span class="hljs-number">1</span>);

}
If our calculator is in a fault state, the last operation was an evaluation, or there's only one symbol displayed, we call the Clear method, which sets the display text to 0, and then return early. In other cases, we remove the last character that was added.
The last method, which will be invoked by the OnPressed event from a Key attached to the CalcButton_Eval, will be implemented in the next part. For now, just outline the method like this.
public void Evaluate()
{
//TODO: implement in the second part of this tutorial
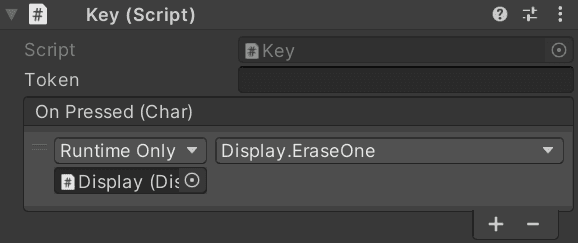
}Now, let's return to the Unity Editor. Select the CalcButton_Eval object, and in the Inspector, click on the plus icon on the Key component under the OnPressed (Char) event. Drag and drop the Display child object into the object slot. On the right side, select the Display.Evaluate function from the selector.
 When we press
 = key on our calculator, the Display.Evaluate function will be called.Next, repeat the same step for the CalcButton_EraseOne, but select the Display.EraseOne function instead. For all the other keys, select the Display.Type function in the same manner.
 When we press
 ← key on our calculator, the Display.EraseOne function will be called.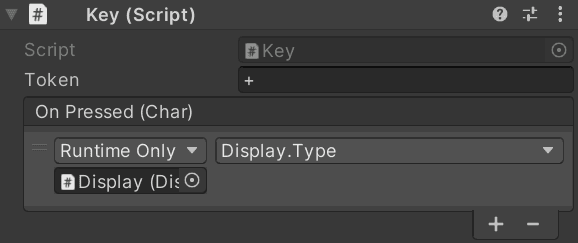 When we press a digit or symbols
 +, -, *, /, ^, ., the Display.Type function will be called, passing the value of the Token as an argument.Testing
To interact with the calculator and test if keys work, there are more approaches you can take. One way is to add an OnCollisionEnter method to the Key script, which calls the Press function when a collision occurs:
private void OnCollisionEnter(Collision col)

{

Press();

}
Then you can add a Cube game object with a BoxCollider and Rigidbody components and let it fall onto the keys to trigger the collision events.
For a more sophisticated approach, you can write a Raycaster script that sends a ray from screen space to world space. When the ray hits an object with the Key script attached to it, it will call the Press method.
using UnityEngine;
public class Raycaster : MonoBehaviour
{
Camera mainCamera;
<span class="hljs-function"><span class="hljs-keyword">private</span> <span class="hljs-keyword">void</span> <span class="hljs-title">Start</span>()</span>
{
mainCamera = Camera.main;
}
<span class="hljs-function"><span class="hljs-keyword">private</span> <span class="hljs-keyword">void</span> <span class="hljs-title">Update</span>()</span>
{
<span class="hljs-keyword">if</span> (Input.GetMouseButtonDown(<span class="hljs-number">0</span>))
{
Ray ray = mainCamera.ScreenPointToRay(Input.mousePosition);
<span class="hljs-keyword">if</span> (Physics.Raycast(ray, <span class="hljs-keyword">out</span> RaycastHit hit))
{
Key key = hit.collider.gameObject.GetComponent<Key>();
<span class="hljs-keyword">if</span> (key)
{
key.Press();
}
}
}
}
}
Camera.main internally triggers the GameObject.Find method, which can be relatively expensive as it iterates over the hierarchy. To improve performance, it's better to call Camera.main once in the Start method and then store a reference to the camera for subsequent use in the Update method.Attach the Raycaster script to a new game object in your scene or to the Main Camera and you will be able to click on calculator keys with left mouse button.
That's all for today. I hope you've enjoyed the first part of this tutorial. See you in part two, where we'll work on making our calculator fully functional.


