Creating an InventoryItem Editor Part 4
We’ll be enabling it in code for the Editor, and to enable it for the tooltip, find the tooltip prefab, navigate to the TextMeshPro component for the description, go into more options and check the “Rich Text” box. This is so the UI can tell if the user is in a state to use the item. x = rect. 33f, rect.
This is the fourth post in my series on creating an InventoryItem Editor in Unity that will edit any child of InventoryItem. If you're not caught up, you can read the first post here, the second post here, and the third post here.
Creating Actions
It’s time to start adding some ActionItems to our RPG. Most of the groundwork has been laid in the Inventory course, but there isn’t a very practical example of an action. We’re going to create a simple healing spell Action that doubles as a spell and a potion.
First, we’re going to make some small modifications to ActionItem.cs
We’ll start by getting rid of the [CreateAssetMenu()] item. There is no real point in creating an ActionItem out of the box, as it doesn’t do anything. The CreateAssetMenu() is so that we can test the basic “does this work” with the UI and nothing more.
We’re also going to add a virtual bool CanUse(GameObject user). This is so the UI can tell if the user is in a state to use the item. It’s an aweful shame to use an item only to have it do nothing because the conditions weren’t met.
For now, this is just
        public virtual bool CanUse(GameObject user)
        {
            return true;
        }
Now you can add code in the ActionStore and ActionSlotUI to determine if the action is useable. While I’m not going to set that up for you, I’ll demonstrate how this works internally in this lesson.
By now, you’ve probably cleverly figured out that we need setters and a DrawCustomInspector() for the ActionItem data, which for now is just a consumable bool. In a future tutorial, I’ll be going through adding cooldown timers to the actions, which will be handled in the ActionItem.
#if UNITY_EDITOR
    <span class="hljs-function"><span class="hljs-keyword">void</span> <span class="hljs-title">SetIsConsumable</span>(<span class="hljs-params"><span class="hljs-built_in">bool</span> <span class="hljs-keyword">value</span></span>)</span>
    {
        <span class="hljs-keyword">if</span> (consumable == <span class="hljs-keyword">value</span>) <span class="hljs-keyword">return</span>;
        SetUndo(<span class="hljs-keyword">value</span>?<span class="hljs-string">"Set Consumable"</span>:<span class="hljs-string">"Set Not Consumable"</span>);
        consumable = <span class="hljs-keyword">value</span>;
        Dirty();
    }

    <span class="hljs-built_in">bool</span> drawActionItem = <span class="hljs-literal">true</span>;
    <span class="hljs-function"><span class="hljs-keyword">public</span> <span class="hljs-keyword">override</span> <span class="hljs-keyword">void</span> <span class="hljs-title">DrawCustomInspector</span>()</span>
    {
        <span class="hljs-keyword">base</span>.DrawCustomInspector();
        drawActionItem = EditorGUILayout.Foldout(drawActionItem, <span class="hljs-string">"Action Item Data"</span>);
        <span class="hljs-keyword">if</span> (!drawActionItem) <span class="hljs-keyword">return</span>;
        EditorGUILayout.BeginVertical(contentStyle);
        SetIsConsumable(EditorGUILayout.Toggle(<span class="hljs-string">"Is Consumable"</span>, consumable));
        EditorGUILayout.EndVertical();
    }

#endif
That’s it for our ActionItem setup. Now it’s time to create our Healing Spell. I make my action scripts in a subfolder of Scripts called Actions. The actual Action Items I create, I put under Game/Actions/Resources
Create a folder Actions and a script HealingSpell.
Here’s what mine looks like:
using GameDevTV.Inventories;

using RPG.Attributes;

using UnityEditor;

using UnityEngine;
namespace RPG.Actions

{

[CreateAssetMenu(fileName="New Healing Spell", menuName = "RPG/Actions/HealingSpell")]

public class HealingSpell : ActionItem

{

[SerializeField] float amountToHeal;

[SerializeField] bool isPercentage;
    <span class="hljs-function"><span class="hljs-keyword">public</span> <span class="hljs-keyword">override</span> <span class="hljs-built_in">bool</span> <span class="hljs-title">CanUse</span>(<span class="hljs-params">GameObject user</span>)</span>
    {
        <span class="hljs-keyword">if</span> (!user.TryGetComponent(<span class="hljs-keyword">out</span> Health health))
            <span class="hljs-keyword">return</span> <span class="hljs-literal">false</span>;
        <span class="hljs-keyword">if</span> (health.IsDead() || health.GetPercentage() >= <span class="hljs-number">100.0f</span>) <span class="hljs-keyword">return</span> <span class="hljs-literal">false</span>;
        <span class="hljs-keyword">return</span> <span class="hljs-literal">true</span>;
    }

    <span class="hljs-function"><span class="hljs-keyword">public</span> <span class="hljs-keyword">override</span> <span class="hljs-keyword">void</span> <span class="hljs-title">Use</span>(<span class="hljs-params">GameObject user</span>)</span>
    {
        <span class="hljs-keyword">if</span> (!user.TryGetComponent(<span class="hljs-keyword">out</span> Health health)) <span class="hljs-keyword">return</span>;
        <span class="hljs-keyword">if</span> (health.IsDead()) <span class="hljs-keyword">return</span>;
        health.Heal(isPercentage ? health.GetMaxHealthPoints() * amountToHeal / <span class="hljs-number">100.0f</span> : amountToHeal);
    }

#if UNITY_EDITOR

void SetAmountToHeal(float value)

{

if (FloatEquals(amountToHeal, value)) return;

SetUndo("Change Amount To Heal");

amountToHeal = value;

Dirty();

}
    <span class="hljs-function"><span class="hljs-keyword">void</span> <span class="hljs-title">SetIsPercentage</span>(<span class="hljs-params"><span class="hljs-built_in">bool</span> <span class="hljs-keyword">value</span></span>)</span>
    {
        <span class="hljs-keyword">if</span> (isPercentage == <span class="hljs-keyword">value</span>) <span class="hljs-keyword">return</span>;
        SetUndo(<span class="hljs-keyword">value</span>?<span class="hljs-string">"Set as Percentage Heal"</span>:<span class="hljs-string">"Set as Absolute Heal"</span>);
        isPercentage = <span class="hljs-keyword">value</span>;
    }

    <span class="hljs-built_in">bool</span> drawHealingData = <span class="hljs-literal">true</span>;
    <span class="hljs-function"><span class="hljs-keyword">public</span> <span class="hljs-keyword">override</span> <span class="hljs-keyword">void</span> <span class="hljs-title">DrawCustomInspector</span>()</span>
    {
        <span class="hljs-keyword">base</span>.DrawCustomInspector();
        drawHealingData = EditorGUILayout.Foldout(drawHealingData, <span class="hljs-string">"HealingSpell Data"</span>);
        <span class="hljs-keyword">if</span> (!drawHealingData) <span class="hljs-keyword">return</span>;
        EditorGUILayout.BeginVertical(contentStyle);
        SetAmountToHeal(EditorGUILayout.IntSlider(<span class="hljs-string">"Amount to Heal"</span>, (<span class="hljs-built_in">int</span>)amountToHeal, <span class="hljs-number">1</span>, <span class="hljs-number">100</span>));
        SetIsPercentage(EditorGUILayout.Toggle(<span class="hljs-string">"Is Percentage"</span>, isPercentage));
        EditorGUILayout.EndVertical();
    }

#endif
}

}
Our CanUse function tests to make sure that the user has a Health component, and that the User is not dead, or has full health. (Healing when Dead… leads to Zombies, we don’t want Zombies!).
The Use function checks again that the User has Health and is not Dead. It then calls Health.Heal() with a value of either the AmountToHeal in points, or a percentage of the user’s Max Health depending on if IsPercentage is checked.
With the editor code I’ve included in the script, it will draw properly in the CustomEditor
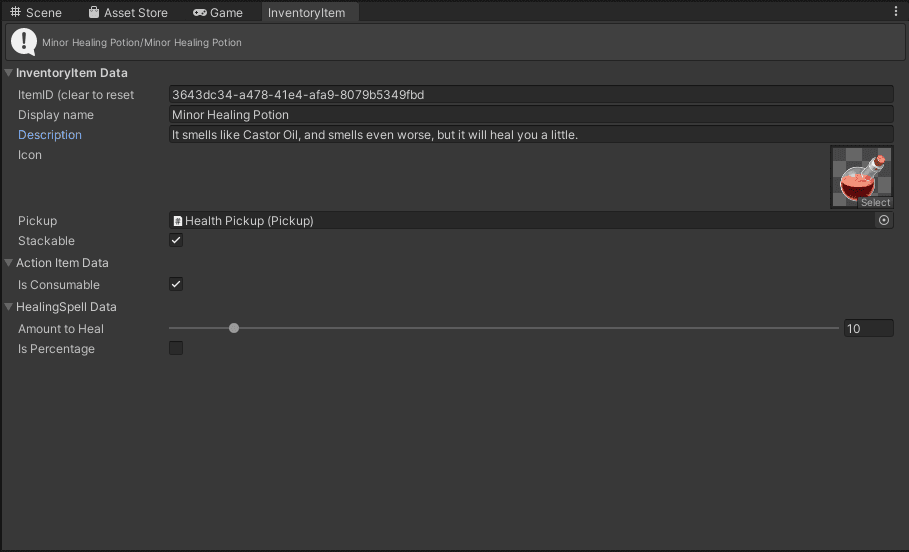 An example of a healing potion
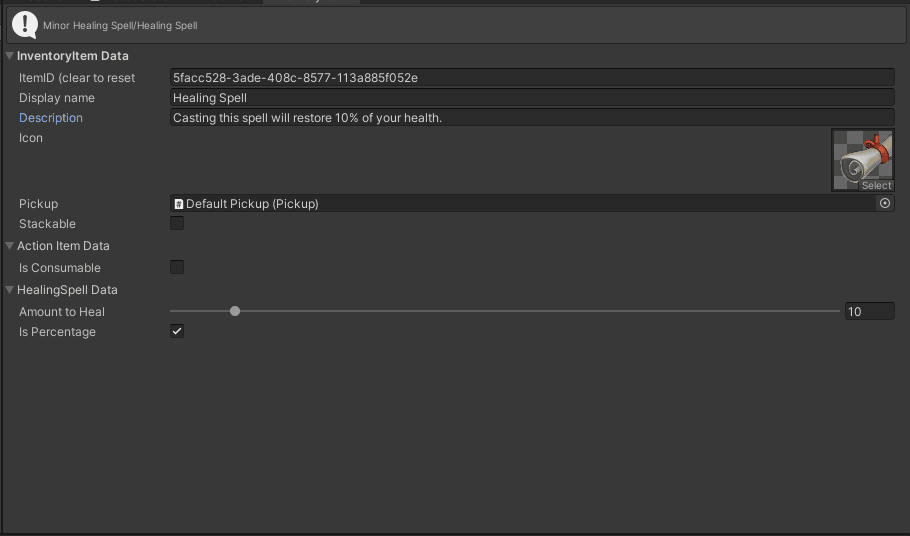 An example of a healing spell.
The Healing Potion will heal the user for 10 points of damage. The spell which doesn’t dissappear on use, will heal for 10% of the user’s max health.
The Tooltip Preview
Believe it or not, we are almost done with our InventoryItem Editor Window. The next stop is adding the tooltip preview, which will entail dividing the window into two panes.
In the first section of Quests and Dialogues, we explore using BeginArea(rect) and EndArea to create moveable nodes on the screen. We’re actually going to use a variation of this, but just creating two fixed nodes. One pane will be 2/3rds the width of the inspector, the second pane will occupy the remaining third of the inspector.
There is a little housekeeping to take care of first. The idea behind this inspector is that we’re going to be simulating the tooltip that users will see in the game. One of the things I felt was important in a tooltip when I did my project is that if an item has bonuses, these should be reflected in the tooltip. This led me to make change to GetDescription() in InventoryItem. Rather than simply leaving it as public string GetDescription(), I changed it to a virtual method.
public virtual string GetDescription()

{

return description;

}
Because there might be some time when a class needs the raw description without additions from other classes, I also included another getter to get the raw description.
public string GetRawDescription()

{

return description;

}
We can now override GetDescription() to suit our needs in child classes.
We’ll start with the WeaponConfig. We want to let the user know if this is a ranged or melee weapon, what the weapon’s range is, what the base damage is, and what bonuses to damage it may have. We probably also want to include the snarky description (at least if you’re like me, item and class descriptions are snarky and meant to bring a chuckle to the player).
        public override string GetDescription()

{

string result = projectile ? "Ranged Weapon" : "Melee Weapon";

result += $"\n\n{GetRawDescription()}\n";

result += $"\nRange {weaponRange} meters";

result += $"\nBase Damage {weaponDamage} points";

if ((int)percentageBonus != 0)

{

string bonus = percentageBonus > 0 ? "<color=#8888ff>bonus</color>" : "<color=#ff8888>penalty</color>";

result += $"\n{(int) percentageBonus} percent {bonus} to attack.";

}

return result;

}
You’ll note that I’m using “\n” tags and color tags within the string. Both TextMeshPro, and the Editor labels support RichText if you enable it. We’ll be enabling it in code for the Editor, and to enable it for the tooltip, find the tooltip prefab, navigate to the TextMeshPro component for the description, go into more options and check the “Rich Text” box.
So what we’re doing with this method is starting by identifying the weapon type. If there is a projectile assigned, then by definition it is a ranged weapon.
It then adds in the raw description, and adds the weapon’s range, damage, and percentage bonus.
Now when a tooltip or the Editor asks for GetDescription() it gets a nicely formatted description with all the information.
Next up is the StatsEquipableItem:
        string FormatAttribute(Modifier mod, bool percent)

{

if ((int)mod.value == 0.0f) return "";

string percentString = percent ? "percent" : "point";

string bonus = mod.value > 0.0f ? "<color=#8888ff>bonus</color>" : "<color=#ff8888>penalty</color>";

return $"{Mathf.Abs((int) mod.value)} {percentString} {bonus} to {mod.stat}\n";

}
    <span class="hljs-function"><span class="hljs-keyword">public</span> <span class="hljs-keyword">override</span> <span class="hljs-built_in">string</span> <span class="hljs-title">GetDescription</span>()</span>
    {
        <span class="hljs-built_in">string</span> result =  GetRawDescription()+<span class="hljs-string">"\n"</span>;
        <span class="hljs-keyword">foreach</span> (Modifier mod <span class="hljs-keyword">in</span> additiveModifiers)
        {
            result += FormatAttribute(mod, <span class="hljs-literal">false</span>);
        }

        <span class="hljs-keyword">foreach</span> (Modifier mod <span class="hljs-keyword">in</span> percentageModifiers)
        {
            result += FormatAttribute(mod, <span class="hljs-literal">true</span>);
        }
        <span class="hljs-keyword">return</span> result;
    }</div></code><button aria-label="Copy code" aria-pressed="false" class="flex justify-center group items-center outline-hidden bg-turquoise shadow-button-secondary fill-shadow-grey hover:bg-fresh-green hover:shadow-button-secondary-hover active:bg-dark-teal active:shadow-button-secondary-active active:fill-ivory transition-all cursor-pointer disabled:cursor-auto select-none absolute right-4 top-4 h-10 w-10"><svg xmlns="http://www.w3.org/2000/svg" height="20px" width="20px" viewBox="0 -960 960 960" fill="inherit" class="group-aria-pressed:hidden"><path d="M360-240q-33 0-56.5-23.5T280-320v-480q0-33 23.5-56.5T360-880h360q33 0 56.5 23.5T800-800v480q0 33-23.5 56.5T720-240H360Zm0-80h360v-480H360v480ZM200-80q-33 0-56.5-23.5T120-160v-520q0-17 11.5-28.5T160-720q17 0 28.5 11.5T200-680v520h400q17 0 28.5 11.5T640-120q0 17-11.5 28.5T600-80H200Zm160-240v-480 480Z"></path></svg><svg xmlns="http://www.w3.org/2000/svg" height="20px" width="20px" viewBox="0 -960 960 960" fill="inherit" class="hidden group-aria-pressed:block"><path d="m382-354 339-339q12-12 28-12t28 12q12 12 12 28.5T777-636L410-268q-12 12-28 12t-28-12L182-440q-12-12-11.5-28.5T183-497q12-12 28.5-12t28.5 12l142 143Z"></path></svg></button></pre><p>The first method is a helper… it takes a Modifier and returns a formatted string… an example would be a Modifier with a stat of Stat.Damage and a value of 10, in the percentageModifier list would read:</p><blockquote>10 percent bonus to Damage</blockquote><p>With this helper method, we can now simply cycle through each additiveModifier and percentageModifier and add the string to the result.</p><p>And finally, we have the HealthPotion… this one you’ll need to do custom for each class you have… so if you make an Ice spell, you’ll need a custom description modifier for it… Here’s mine for HealthPotion</p><pre class="flex flex-row w-full items-start justify-between !p-5 relative break-words whitespace-break-spaces"><code class="hljs language-csharp flex flex-col w-full !pr-11 break-word"><div style="white-space: inherit;">        <span class="hljs-function"><span class="hljs-keyword">public</span> <span class="hljs-keyword">override</span> <span class="hljs-built_in">string</span> <span class="hljs-title">GetDescription</span>()</span>
    {
        <span class="hljs-built_in">string</span> result = GetRawDescription()+<span class="hljs-string">"\n"</span>;
        <span class="hljs-built_in">string</span> spell = isConsumable() ? <span class="hljs-string">"potion"</span> : <span class="hljs-string">"spell"</span>;
        <span class="hljs-built_in">string</span> percent = isPercentage ? <span class="hljs-string">"percent of your Max Health"</span> : <span class="hljs-string">"Health Points."</span>;
        result += <span class="hljs-string">$"This <span class="hljs-subst">{spell}</span> will restore <span class="hljs-subst">{(<span class="hljs-built_in">int</span>)amountToHeal}</span> <span class="hljs-subst">{percent}</span>"</span>;
        <span class="hljs-keyword">return</span> result;
    }</div></code><button aria-label="Copy code" aria-pressed="false" class="flex justify-center group items-center outline-hidden bg-turquoise shadow-button-secondary fill-shadow-grey hover:bg-fresh-green hover:shadow-button-secondary-hover active:bg-dark-teal active:shadow-button-secondary-active active:fill-ivory transition-all cursor-pointer disabled:cursor-auto select-none absolute right-4 top-4 h-10 w-10"><svg xmlns="http://www.w3.org/2000/svg" height="20px" width="20px" viewBox="0 -960 960 960" fill="inherit" class="group-aria-pressed:hidden"><path d="M360-240q-33 0-56.5-23.5T280-320v-480q0-33 23.5-56.5T360-880h360q33 0 56.5 23.5T800-800v480q0 33-23.5 56.5T720-240H360Zm0-80h360v-480H360v480ZM200-80q-33 0-56.5-23.5T120-160v-520q0-17 11.5-28.5T160-720q17 0 28.5 11.5T200-680v520h400q17 0 28.5 11.5T640-120q0 17-11.5 28.5T600-80H200Zm160-240v-480 480Z"></path></svg><svg xmlns="http://www.w3.org/2000/svg" height="20px" width="20px" viewBox="0 -960 960 960" fill="inherit" class="hidden group-aria-pressed:block"><path d="m382-354 339-339q12-12 28-12t28 12q12 12 12 28.5T777-636L410-268q-12 12-28 12t-28-12L182-440q-12-12-11.5-28.5T183-497q12-12 28.5-12t28.5 12l142 143Z"></path></svg></button></pre><p>Now that our Descriptions are out of the way, it’s time to get to the business of making Panes…<br>I’ve separated out the code to draw the Inspector into it’s own method, and created a method for drawing the tooltip. We’ll start with what our OnGui looks like, because this is how we’re going to create two panes…</p><pre class="flex flex-row w-full items-start justify-between !p-5 relative break-words whitespace-break-spaces"><code class="hljs language-csharp flex flex-col w-full !pr-11 break-word"><div style="white-space: inherit;"> GUIStyle previewStyle;
    GUIStyle descriptionStyle;
    GUIStyle headerStyle;

    <span class="hljs-function"><span class="hljs-keyword">void</span> <span class="hljs-title">OnEnable</span>()</span>
    {
        previewStyle = <span class="hljs-keyword">new</span> GUIStyle();
        previewStyle.normal.background = EditorGUIUtility.Load(<span class="hljs-string">"Assets/Asset Packs/Fantasy RPG UI Sample/UI/Parts/Background_06.png"</span>) <span class="hljs-keyword">as</span> Texture2D;
        previewStyle.padding = <span class="hljs-keyword">new</span> RectOffset(<span class="hljs-number">40</span>, <span class="hljs-number">40</span>, <span class="hljs-number">40</span>, <span class="hljs-number">40</span>);
        previewStyle.border = <span class="hljs-keyword">new</span> RectOffset(<span class="hljs-number">0</span>, <span class="hljs-number">0</span>, <span class="hljs-number">0</span>, <span class="hljs-number">0</span>);


    }

    <span class="hljs-built_in">bool</span> stylesInitialized = <span class="hljs-literal">false</span>;

    <span class="hljs-function"><span class="hljs-keyword">void</span> <span class="hljs-title">OnGUI</span>()</span>
    {
        <span class="hljs-keyword">if</span> (selected == <span class="hljs-literal">null</span>)
        {
            EditorGUILayout.HelpBox(<span class="hljs-string">"No Item Selected"</span>, MessageType.Error);
            <span class="hljs-keyword">return</span>;
        }
        <span class="hljs-keyword">if</span> (!stylesInitialized)
        {
            descriptionStyle = <span class="hljs-keyword">new</span> GUIStyle(GUI.skin.label)
            {
                richText = <span class="hljs-literal">true</span>,
                wordWrap = <span class="hljs-literal">true</span>,
                stretchHeight = <span class="hljs-literal">true</span>,
                fontSize = <span class="hljs-number">14</span>,
                alignment = TextAnchor.MiddleCenter
            };
            headerStyle = <span class="hljs-keyword">new</span> GUIStyle(descriptionStyle) { fontSize = <span class="hljs-number">24</span> };
            stylesInitialized = <span class="hljs-literal">true</span>;
        }
        Rect rect = <span class="hljs-keyword">new</span> Rect(<span class="hljs-number">0</span>, <span class="hljs-number">0</span>, position.width * <span class="hljs-number">.65</span>f, position.height);
        DrawInspector(rect);
        rect.x = rect.width;
        rect.width /= <span class="hljs-number">2.0f</span>;

        DrawPreviewTooltip(rect);
    }</div></code><button aria-label="Copy code" aria-pressed="false" class="flex justify-center group items-center outline-hidden bg-turquoise shadow-button-secondary fill-shadow-grey hover:bg-fresh-green hover:shadow-button-secondary-hover active:bg-dark-teal active:shadow-button-secondary-active active:fill-ivory transition-all cursor-pointer disabled:cursor-auto select-none absolute right-4 top-4 h-10 w-10"><svg xmlns="http://www.w3.org/2000/svg" height="20px" width="20px" viewBox="0 -960 960 960" fill="inherit" class="group-aria-pressed:hidden"><path d="M360-240q-33 0-56.5-23.5T280-320v-480q0-33 23.5-56.5T360-880h360q33 0 56.5 23.5T800-800v480q0 33-23.5 56.5T720-240H360Zm0-80h360v-480H360v480ZM200-80q-33 0-56.5-23.5T120-160v-520q0-17 11.5-28.5T160-720q17 0 28.5 11.5T200-680v520h400q17 0 28.5 11.5T640-120q0 17-11.5 28.5T600-80H200Zm160-240v-480 480Z"></path></svg><svg xmlns="http://www.w3.org/2000/svg" height="20px" width="20px" viewBox="0 -960 960 960" fill="inherit" class="hidden group-aria-pressed:block"><path d="m382-354 339-339q12-12 28-12t28 12q12 12 12 28.5T777-636L410-268q-12 12-28 12t-28-12L182-440q-12-12-11.5-28.5T183-497q12-12 28.5-12t28.5 12l142 143Z"></path></svg></button></pre><p>I’m actually throwing a few things in here… We need some styles to properly draw the Tooltip, and there are specific places where they should be initialized…<br>You can initialize the previewStyle (which defines the background of the rect) in OnEnable. That’s useful because you only want to load the background once, not every frame.<br>The other styles MUST be in the OnGUI thread (either in OnGUI or called by OnGUI because they are copying an existing style, and Unity gets upset if you put it in OnEnable.</p><p>DescriptionStyle defines the text. If you want to change the font, you can add it in the initialization block.<br>HeaderStyle copies the DescriptionStyle, but increases the font size, so the name is bigger in the tooltip.</p><p>I use the bool stylesInitialized to prevent the styles from being defined over and over again. This is very important if you load a font, as you don’t want to load a font each frame.</p><p>Next, we create a Rect based on the EditorWindow’s dimensions…<br>The EditorWindow has a property Rect position which holds the current location, width and height of the window. Our BeginArea, however, needs to start at 0,0, since the dimensions you give to BeginArea are relative to position, not relative to the editor…<br>We’ll set the rect’s width to position.width*.66 (2/3rds of the window) and the height to position.height to take the whole window.<br>This rect will be passed to DrawInspector.</p><pre class="flex flex-row w-full items-start justify-between !p-5 relative break-words whitespace-break-spaces"><code class="hljs language-csharp flex flex-col w-full !pr-11 break-word"><div style="white-space: inherit;">        Vector2 scrollPosition;
    <span class="hljs-function"><span class="hljs-keyword">void</span> <span class="hljs-title">DrawInspector</span>(<span class="hljs-params">Rect rect</span>)</span>
    {
        GUILayout.BeginArea(rect);
        scrollPosition = GUILayout.BeginScrollView(scrollPosition);
        selected.DrawCustomInspector();
        GUILayout.EndScrollView();
        GUILayout.EndArea();
    }</div></code><button aria-label="Copy code" aria-pressed="false" class="flex justify-center group items-center outline-hidden bg-turquoise shadow-button-secondary fill-shadow-grey hover:bg-fresh-green hover:shadow-button-secondary-hover active:bg-dark-teal active:shadow-button-secondary-active active:fill-ivory transition-all cursor-pointer disabled:cursor-auto select-none absolute right-4 top-4 h-10 w-10"><svg xmlns="http://www.w3.org/2000/svg" height="20px" width="20px" viewBox="0 -960 960 960" fill="inherit" class="group-aria-pressed:hidden"><path d="M360-240q-33 0-56.5-23.5T280-320v-480q0-33 23.5-56.5T360-880h360q33 0 56.5 23.5T800-800v480q0 33-23.5 56.5T720-240H360Zm0-80h360v-480H360v480ZM200-80q-33 0-56.5-23.5T120-160v-520q0-17 11.5-28.5T160-720q17 0 28.5 11.5T200-680v520h400q17 0 28.5 11.5T640-120q0 17-11.5 28.5T600-80H200Zm160-240v-480 480Z"></path></svg><svg xmlns="http://www.w3.org/2000/svg" height="20px" width="20px" viewBox="0 -960 960 960" fill="inherit" class="hidden group-aria-pressed:block"><path d="m382-354 339-339q12-12 28-12t28 12q12 12 12 28.5T777-636L410-268q-12 12-28 12t-28-12L182-440q-12-12-11.5-28.5T183-497q12-12 28.5-12t28.5 12l142 143Z"></path></svg></button></pre><p>DrawInspector creates a drawing area, and also a scrolling area in case the inspector overflows horizontally.<br>Then it’s back to the selected.DrawCustomInspector();</p><p>This leaves the moment I teased you with in the first post of this tutorial, the Preview Tooltip…</p><p>If you look again at OnGUI, we’re setting the x of rect to the width of the rect, then dividing the width by 2 before passing it to DrawPreviewTooltip… This is just a trick to make a rect of the other 1/3rd of the Editor Window. You can change the ratios if you want, just be careful not to accidentally overlap the panes.</p><pre class="flex flex-row w-full items-start justify-between !p-5 relative break-words whitespace-break-spaces"><code class="hljs language-csharp flex flex-col w-full !pr-11 break-word"><div style="white-space: inherit;">        <span class="hljs-function"><span class="hljs-keyword">void</span> <span class="hljs-title">DrawPreviewTooltip</span>(<span class="hljs-params">Rect rect</span>)</span>
    {
        GUILayout.BeginArea(rect, previewStyle);
        <span class="hljs-keyword">if</span> (selected.GetIcon() != <span class="hljs-literal">null</span>)
        {
            <span class="hljs-built_in">float</span> iconSize = Mathf.Min(rect.width * <span class="hljs-number">.33</span>f, rect.height * <span class="hljs-number">.33</span>f);
            Rect texRect = GUILayoutUtility.GetRect(iconSize, iconSize);
            GUI.DrawTexture(texRect, selected.GetIcon().texture, ScaleMode.ScaleToFit);
        }

        EditorGUILayout.LabelField(selected.GetDisplayName(), headerStyle);
        EditorGUILayout.LabelField(selected.GetDescription(), descriptionStyle);
        GUILayout.EndArea();
    }</div></code><button aria-label="Copy code" aria-pressed="false" class="flex justify-center group items-center outline-hidden bg-turquoise shadow-button-secondary fill-shadow-grey hover:bg-fresh-green hover:shadow-button-secondary-hover active:bg-dark-teal active:shadow-button-secondary-active active:fill-ivory transition-all cursor-pointer disabled:cursor-auto select-none absolute right-4 top-4 h-10 w-10"><svg xmlns="http://www.w3.org/2000/svg" height="20px" width="20px" viewBox="0 -960 960 960" fill="inherit" class="group-aria-pressed:hidden"><path d="M360-240q-33 0-56.5-23.5T280-320v-480q0-33 23.5-56.5T360-880h360q33 0 56.5 23.5T800-800v480q0 33-23.5 56.5T720-240H360Zm0-80h360v-480H360v480ZM200-80q-33 0-56.5-23.5T120-160v-520q0-17 11.5-28.5T160-720q17 0 28.5 11.5T200-680v520h400q17 0 28.5 11.5T640-120q0 17-11.5 28.5T600-80H200Zm160-240v-480 480Z"></path></svg><svg xmlns="http://www.w3.org/2000/svg" height="20px" width="20px" viewBox="0 -960 960 960" fill="inherit" class="hidden group-aria-pressed:block"><path d="m382-354 339-339q12-12 28-12t28 12q12 12 12 28.5T777-636L410-268q-12 12-28 12t-28-12L182-440q-12-12-11.5-28.5T183-497q12-12 28.5-12t28.5 12l142 143Z"></path></svg></button></pre><p>First, we begin a new area with our Rect…<br>Then, if there is an Icon, we draw the icon with it’s size based on the size of the pane.<br>GUILayoutUtility.GetRect(iconSize, iconSize) is a handy function. It instructs the layout to set aside the area requested, and returns a rect of the location that it has set aside…<br>We then use that rect as the coordinates for GUI.DrawTexture to draw our sprite.</p><p>After that, we just draw Labelfields for the displayName and description. Because we overrode the description, it will automatically have the correct information based on the class…</p><p>This pretty much concludes the tutorial on creating an InventoryItem EditorWindow.</p><p>Here are a couple of challenges if you want to extend your adventure in EditorWindow coding…</p><ul><li>It’s fairly easy to make the regular inspectors use our DrawCustomInspectors(). Research regular Editors and create an Editor that will edit InventoryItems and it’s children (there is an optional boolean on the [directive] you’ll be putting on the Editor to edit the children as well). While the tutorials out there have you drawing each property with specialized property commands and creating positions, etc, all you really need to do is get an instance of the selected object, and call DrawCustomInspector(). I’ll leave this challenge unsolved in the repo for now.</li><li>Add a Rarity to the InventoryItem’s list of properties… Most games have rarities like Common, Uncommon, Rare, Epic, and Legendary… perhaps an Enum? Change the color of the title in the tooltip to match the rarity…</li></ul>